Category Archives: Game

Custom Game Engine on iOS: Audio

Having previously covered the general architecture and the graphics system, we come now to the audio part of the game engine. One might be surprised (or unsurprised depending on one’s expectations) that it is conceptually very similar to how the graphics work. As a quick recap of what was covered in the last part, the platform sends some memory to the game representing a bitmap that the game draws into for each frame, then takes that bitmap at the end of the frame and renders it onto the screen.

For my audio system, it works very much the same. The platform sends some memory representing an audio buffer to the game layer. Like the graphics system, the game layer does all the heavy lifting, handling the mixing of audio sources from music and sound effects into the buffer passed in by the platform layer. The platform layer then takes this audio buffer and sends it to the audio output provided by the operating system.

To do this, the platform layer needs to talk to Core Audio, which powers the audio for all of Apple’s platforms. Core Audio is a purely C-based API, and can be a little cumbersome to deal with at times (albeit very powerful). However, since the game layer handles all the mixing and all the platform layer is concerned with is one master audio buffer, calls to the Core Audio API are minimal.

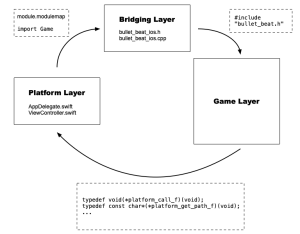
In order to encapsulate data around the audio buffer, the bridging layer declares a PlatformAudio struct (recall that the bridging layer is a .h/.cpp file pair that connects the game, written in C++, to the iOS platform layer written in Swift):

struct PlatformAudio {
    double sampleRate;
    uint32_t channels;
    uint32_t bytesPerFrame;
    void *samples;
};

Initialization of this struct and the audio system as a whole takes place in the didFinishLaunching method of the AppDelegate:

class AppDelegate: UIResponder, UIApplicationDelegate {

    typealias AudioSample = Int16
    var audioOutput: AudioComponentInstance?
    var platformAudio: PlatformAudio!

    func application(_ application: UIApplication, didFinishLaunchingWithOptions launchOptions: [UIApplication.LaunchOptionsKey: Any]?) -> Bool {
        // Platform initialization
        
        if initAudio(sampleRate: 48000.0, channels: 2) {
            ios_audio_initialize(&platformAudio)
            AudioOutputUnitStart(audioOutput!)
        }
        
        ios_game_startup()
        
        let screen = UIScreen.main
        window = UIWindow(frame: screen.bounds)
        window?.rootViewController = ViewController()
        window?.makeKeyAndVisible()
        
        return true
    }
}

The AudioComponentInstance object represents an Audio Unit, which in Core Audio is required for working with audio at a low level, and provides the lowest latency for audio processing. After initializing the platform layer (seen back in the first part of this series), the audio system is first initialized on the OS side before initializing it in the game layer (via the bridging interface). Once that is done, the output unit is started — it will become clearer what this actually does very soon.

The audio interface in the bridging layer consists of three functions:

struct PlatformAudio* ios_create_platform_audio(double sampleRate, uint16_t channels, uint16_t bytesPerSample);
void ios_audio_initialize(struct PlatformAudio *platformAudio);
void ios_audio_deinitialize(struct PlatformAudio *platformAudio);

Before moving on to have a look at the initAudio method, here is the implementation for these functions (in the bridging .cpp file):

static bbAudioBuffer audioBuffer = {0};

struct PlatformAudio*
ios_create_platform_audio(double sampleRate, uint16_t channels, uint16_t bytesPerSample) {
    static PlatformAudio platformAudio = {};
    platformAudio.sampleRate = sampleRate;
    platformAudio.channels = channels;
    platformAudio.bytesPerFrame = bytesPerSample * channels;
    return &platformAudio;
}

void
ios_audio_initialize(struct PlatformAudio *platformAudio) {
    platform.audioSampleRate = platformAudio->sampleRate;
    audioBuffer.sampleRate = platformAudio->sampleRate;
    audioBuffer.channels = platformAudio->channels;
    audioBuffer.samples = (int16_t *)calloc(audioBuffer.sampleRate, platformAudio->bytesPerFrame);
    audioBuffer.mixBuffer = (float *)calloc(audioBuffer.sampleRate, sizeof(float) * platformAudio->channels);
    platformAudio->samples = audioBuffer.samples;
}

void
ios_audio_deinitialize(struct PlatformAudio *platformAudio) {
    free(audioBuffer.samples);
    free(audioBuffer.mixBuffer);
}

Pretty straightforward, really. The ios_create_platform_audio function is called at the start of initAudio:

private func initAudio(sampleRate: Double, channels: UInt16) -> Bool {
    let bytesPerSample = MemoryLayout<AudioSample>.size
    if let ptr = ios_create_platform_audio(sampleRate, channels, UInt16(bytesPerSample)) {
        platformAudio = ptr.pointee
    } else {
        return false
    }

    var streamDescription = AudioStreamBasicDescription(mSampleRate: sampleRate,
                                                        mFormatID: kAudioFormatLinearPCM,
                                                        mFormatFlags: kLinearPCMFormatFlagIsSignedInteger | kLinearPCMFormatFlagIsPacked,
                                                        mBytesPerPacket: platformAudio.bytesPerFrame,
                                                        mFramesPerPacket: 1,
                                                        mBytesPerFrame: platformAudio.bytesPerFrame,
                                                        mChannelsPerFrame: platformAudio.channels,
                                                        mBitsPerChannel: UInt32(bytesPerSample * 8),
                                                        mReserved: 0)
    
    var desc = AudioComponentDescription()
    desc.componentType = kAudioUnitType_Output
    desc.componentSubType = kAudioUnitSubType_RemoteIO
    desc.componentManufacturer = kAudioUnitManufacturer_Apple
    desc.componentFlags = 0
    desc.componentFlagsMask = 0
    
    guard let defaultOutputComponent = AudioComponentFindNext(nil, &desc) else {
        return false
    }
    
    var status = AudioComponentInstanceNew(defaultOutputComponent, &audioOutput)
    if let audioOutput = audioOutput, status == noErr {
        var input = AURenderCallbackStruct()
        input.inputProc = ios_render_audio
        withUnsafeMutableBytes(of: &platformAudio) { ptr in
            input.inputProcRefCon = ptr.baseAddress
        }
        
        var dataSize = UInt32(MemoryLayout<AURenderCallbackStruct>.size)
        status = AudioUnitSetProperty(audioOutput, kAudioUnitProperty_SetRenderCallback, kAudioUnitScope_Input, 0, &input, dataSize)
        if status == noErr {
            dataSize = UInt32(MemoryLayout<AudioStreamBasicDescription>.size)
            status = AudioUnitSetProperty(audioOutput, kAudioUnitProperty_StreamFormat, kAudioUnitScope_Input, 0, &streamDescription, dataSize)
            if status == noErr {
                status = AudioUnitInitialize(audioOutput)
                return status == noErr
            }
        }
    }
    
    return false
}

After creating the PlatformAudio instance, the method proceeds to setup the output Audio Unit on the Core Audio side. Core Audio needs to know what kind of audio it will be dealing with and how the data is laid out in memory in order to interpret it correctly, and this requires an AudioStreamBasicDescription instance that is eventually set as a property on the audio output unit.

The first property is easy enough, just being the sample rate of the audio. For the mFormatID parameter, I pass in a flag specifying that the audio data will be uncompressed — just standard linear PCM. Next, I pass in some flags for the mFormatFlags parameter specifying that the audio samples will be packed signed 16 bit integers. Another flag that can be set here is one that specifies that the audio will be non-interleaved, meaning that all samples for each channel are grouped together, and each channel is laid out end-to-end. As I have omitted this flag, the audio is interleaved, meaning that the samples for each channel are interleaved in a single buffer as in the diagram below:

Interleaved audio layout

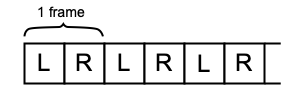
Interleaved audio layout.

(As a quick side-note, although the final format of the audio is signed 16 bit integers, the game layer mixes in floating point. This is a common workflow in audio, to mix and process at a higher resolution and sampling rates than the final output.)

The rest of the fields in the stream description require a bit of calculation. Well, except for mFramesPerPacket, which is set to 1 for uncompressed audio; and since there is 1 frame per packet, mBytesPerPacket is the same as the number of bytes per frame. mChannelsPerFrame is just going to be the number of channels, and mBitsPerChannel is just going to be the size of an audio sample expressed as bits. The bytes per frame value, as seen above, is simply calculated from the bit depth of the audio (bytes per sample) and the number of channels.

Next, I need to get the output Audio Component. I need an Audio Unit in the Core Audio system that will send audio to the output hardware of the device. To find this component, an AudioComponentDescription is required and needs to be configured with parameters that return the desired unit (iOS contains a number of built-in units, from various I/O units to mixer and effect units). To find the audio output unit I need, I specify “output” for the type, “remote I/O” for sub type (the RemoteIO unit is the only one that connects to the audio hardware for I/O), and “Apple” as the manufacturer.

Once the component is found with a call to AudioComponentFindNext, I initialize the audio output unit with this component. This Audio Unit (and Core Audio in general) works on a “pull model” — you register a function with Core Audio who will then call you whenever it needs audio from you to fill its internal buffers. This function gets called on a high-priority thread, and runs at a faster rate than the game’s update function. Effectively this means you have less time to do audio processing per call than you do for simulating and rendering a frame, so the audio processing needs to be fast enough to keep up. Missing an audio update means the buffer that is eventually sent to the hardware is most likely empty, resulting in audio artifacts like clicks or pops because of the discontinuity between the audio in the previous buffer.

In order to set the callback function on the Audio Unit, I need an AURenderCallbackStruct instance that takes a pointer to the callback function and a context pointer. Once I have this, it is set as a property on the Audio Unit by calling AudioUnitSetProperty, and specifying “input” as the scope (this tells Core Audio that this property is for audio coming in to the unit). Next I take the stream description that was initialized earlier and set it as a property on the Audio Unit, also on the “input” scope (i.e. this tells the Audio Unit about the audio data coming in to it). Finally, the audio is initialized and is then ready for processing. The call we saw earlier to start the Audio Unit after initialization tells the OS to start calling this callback function to receive audio.

The callback function itself is actually quite simple:

fileprivate func ios_render_audio(inRefCon: UnsafeMutableRawPointer,
                                  ioActionFlags: UnsafeMutablePointer<AudioUnitRenderActionFlag>,
                                  inTimeStamp: UnsafePointer<AudioTimeStamp>,
                                  inBusNumber: UInt32,
                                  inNumberFrames: UInt32,
                                  ioData: UnsafeMutablePointer<AudioBufferList>?) -> OSStatus
{
    var platformAudio = inRefCon.assumingMemoryBound(to: PlatformAudio.self).pointee
    ios_process_audio(&platformAudio, inNumberFrames)
    
    let buffer = ioData?.pointee.mBuffers.mData
    buffer?.copyMemory(from: platformAudio.samples, byteCount: Int(platformAudio.bytesPerFrame * inNumberFrames))
    
    return noErr
}

Similar to the graphics system, here is where the call is made to the bridging layer to process (i.e. fill) the audio buffer with data from the game. Core Audio calls this function with the number of frames it needs as well as the buffer(s) to place the data in. Once the game layer is done processing the audio, the data is copied into the buffer provided by the OS. The ios_process_audio function simply forwards the call to the game layer after specifying how many frames of audio the system requires:

void
ios_process_audio(struct PlatformAudio *platformAudio, uint32_t frameCount) {
    audioBuffer.frameCount = frameCount;
    process_audio(&audioBuffer, &gameMemory, &platform);
}

The last part to cover in the audio system of my custom game engine is how to handle audio with regard to the lifecycle of the application. We saw how audio is initialized in the didFinishLaunching method of the AppDelegate, so naturally the audio is shut down in the applicationWillTerminate method:

func applicationWillTerminate(_ application: UIApplication) {
    if let audioOutput = audioOutput {
        AudioOutputUnitStop(audioOutput)
        AudioUnitUninitialize(audioOutput)
        AudioComponentInstanceDispose(audioOutput)
    }
    
    ios_game_shutdown()
    
    ios_audio_deinitialize(&platformAudio)
    ios_platform_shutdown()
}

When the user hits the Home button and sends the game into the background, audio processing needs to stop, and when the game is brought back to the foreground again, it needs to resume playing. Stopping the Audio Unit will halt the callback function that processes audio from the game, and starting it will cause Core Audio to resume calling the function as needed.

func applicationWillEnterForeground(_ application: UIApplication) {
    if let audioOutput = audioOutput {
        AudioOutputUnitStart(audioOutput)
    }
    
    if let vc = window?.rootViewController as? ViewController {
        vc.startGame()
    }
}

func applicationDidEnterBackground(_ application: UIApplication) {
    if let audioOutput = audioOutput {
        AudioOutputUnitStop(audioOutput)
    }
    
    if let vc = window?.rootViewController as? ViewController {
        vc.stopGame()
    }
}

This completes my detailed overview of the three critical pieces of any game engine: the platform, the graphics, and the audio. And as I did with the blog post on the graphics system, here is a short demo of the audio system running in the game engine:

Custom Game Engine on iOS: Graphics

In the last part, I gave a brief glimpse into the graphics part of implementing a custom game engine on iOS — setting a Metal-backed view as the main view of the game’s View Controller. This view is what will contain the entire visual representation of the game. In this part, I will detail how I go about setting up the Metal view and how the game itself renders a frame into it. And just to reiterate what I said in the last part, this is just one way of doing this; this works for me and the game I am making. If nothing else, let it serve as a guide, reference, and/or inspiration.

First of all, I make use of a software renderer that I wrote for my game. This is quite  unusual these days with all the high-powered and specialized GPUs in nearly every device out there, but you might be surprised at what a properly optimized software renderer is capable of; not to mention some nice benefits as well, such as avoiding the complexities of GPU APIs and porting issues (Metal vs. DirectX vs. OpenGL, etc.). I also really enjoyed the knowledge and insight I gained through the process of writing my own renderer. So that being said, why the need for the Metal view, or the use of Metal at all on iOS?

The general overview of the way it works is that each frame of the game is simulated and then rendered into a bitmap by the game layer. This bitmap (or more specifically the memory for this bitmap) is provided to the game by the platform layer. Once the game is done simulating a frame and rendering the result into this bitmap, the platform layer takes this bitmap and displays it on the screen using Metal.

To represent this bitmap, I have a struct called PlatformTexture defined in the bridging header file we saw in the last part:

struct PlatformTexture {
    uint16_t width;
    uint16_t height;
    size_t bytesPerRow;
    uint32_t *memory;
    uint32_t *texture;
};

struct PlatformTexture* ios_create_platform_texture(uint16_t screenWidth, uint16_t screenHeight);
void ios_graphics_initialize(struct PlatformTexture *platformTexture);
void ios_graphics_deinitialize(struct PlatformTexture *platformTexture);

The implementations of these functions (in the bridging .cpp file) look like this:

struct PlatformTexture*
ios_create_platform_texture(uint16_t screenWidth, uint16_t screenHeight) {
    static PlatformTexture platformTexture = {};
    platformTexture.width = screenWidth;
    platformTexture.height = screenHeight;
    return &platformTexture;
}

typedef uint32_t bbPixel;
constexpr size_t kPixelSize = sizeof(bbPixel);

void
ios_graphics_initialize(struct PlatformTexture *platformTexture) {
    uint16_t allocWidth = platformTexture->width + 2*CLIP_REGION_PIXELS;
    uint16_t allocHeight = platformTexture->height + 2*CLIP_REGION_PIXELS;
    size_t memorySize = allocWidth * allocHeight * kPixelSize;
    platformTexture->memory = (bbPixel *)ios_allocate_memory(memorySize);
    if (platformTexture->memory) {
        platformTexture->texture = platformTexture->memory + (intptr_t)(CLIP_REGION_PIXELS * allocWidth + CLIP_REGION_PIXELS);
        platformTexture->bytesPerRow = platformTexture->width * kPixelSize;
    }
}

void
ios_graphics_deinitialize(struct PlatformTexture *platformTexture) {
    ios_deallocate_memory(platformTexture->memory);
}

The instance itself of PlatformTexture is owned by the bridging .cpp file, so it returns a pointer to the caller (in this case the platform layer). Initialization allocates memory for the texture, including extra for a clip region, or pixel “apron”, around the texture to guard against writing past the bounds of the texture. (It’s also useful for effects like screen shake.) Essentially it can be visualized like this:

PlatformTexture memory

Visualization of the PlatformTexture memory.

Furthermore, the pixel format of the texture is the standard RGBA format with each pixel represented as a packed 32-bit integer (8 bits per component).

Initialization of the PlatformTexture is handled within the ViewController class:

override func viewDidLoad() {
    super.viewDidLoad()
    
    if let ptr = ios_create_platform_texture(UInt16(view.frame.width), UInt16(view.frame.height)) {
        platformTexture = ptr.pointee
        ios_graphics_initialize(&platformTexture)
    }
    
    startGame()
}

deinit {
    ios_graphics_deinitialize(&platformTexture)
}

To simulate a frame of the game, the update_and_render function from the game layer needs to be called every 1/60th of a second (to achieve 60 fps), and as I mentioned earlier, the platform layer needs to pass the game layer some memory for the bitmap that will be rendered into. This memory is, of course, the texture pointer in the PlatformTexture type. Here is the function as included in the .h/.cpp bridging files:

// declaration in .h file
void ios_update_and_render(struct PlatformTexture *platformTexture, float dt);

// definition in .cpp file
void
ios_update_and_render(PlatformTexture *platformTexture, float dt) {
    // Map input (from previous part)
    
    bbTextureBuffer buf = {0};
    buf.width = platformTexture->width;
    buf.height = platformTexture->height;
    buf.buffer = platformTexture->texture;
    
    update_and_render(&buf, &input, &gameMemory, &platform, dt);
}

The call to the ios_update_and_render function converts the PlatformTexture into the struct the game actually expects, and then makes a call to the game layer to update and render the frame. (Again, this conversion is needed because bbTextureBuffer is declared in a C++ interface file which cannot interoperate with Swift, so the plain C PlatformTexture data type acts as a bridge between the Swift side and the C++ side.)

The ios_update_and_render function is called from the getFrame method of the View Controller (which was shown in the last part on setting up the platform layer):

@objc private func getFrame(_ sender: CADisplayLink) {
    ios_begin_frame()
    
    let dt = Float(sender.targetTimestamp - sender.timestamp)
    ios_update_and_render(&platformTexture, dt)
    
    if let metalView = view as? MetalView {
        metalView.renderFrame(platformTexture: platformTexture)
    }
    
    ios_end_frame()
}

Here we see how Metal comes into the picture (no pun intended). After the game is done simulating and rendering the frame into the PlatformTexture object, the Metal view takes over and draws the image to the screen.

We saw in the previous part on setting up the platform layer where the MetalView got initialized, but now let’s look at what that contains. UIViews in iOS are all what Apple calls “layer-backed”, containing the backing Core Animation layer that defines the actual visual contents of the view (unlike NSView on macOS which need to be assigned a layer if it is to draw or display something). To make a UIView subclass a Metal-backed view, we need to tell it to use the CAMetalLayer class for it’s Core Animation layer by overwriting the class property layerClass:

class MetalView: UIView {
    var commandQueue: MTLCommandQueue?
    var renderPipeline: MTLRenderPipelineState?
    var renderPassDescriptor = MTLRenderPassDescriptor()
    var vertexBuffer: MTLBuffer?
    var uvBuffer: MTLBuffer?
    var texture: MTLTexture?
    
    let semaphore = DispatchSemaphore(value: 1)
    
    class override var layerClass: AnyClass {
        return CAMetalLayer.self
    }
    
    init?(metalDevice: MTLDevice) {
        super.init(frame: UIScreen.main.bounds)
        guard let metalLayer = layer as? CAMetalLayer else { return nil }
        metalLayer.framebufferOnly = true
        metalLayer.pixelFormat = .bgra8Unorm
        metalLayer.device = metalDevice
        
        // Additional initialization...
    }
}

The init method of the view configures the properties of the Metal layer. Setting the framebufferOnly property to true tells Metal that this layer will only be used as a render target, allowing for some optimizations when rendering the layer for display. Framebuffer targets must use the bgra8Unorm pixel format. This format is simply an unsigned 32-bit RGBA format, but in BGRA order.

We now get into more nitty-gritty Metal stuff. In order to do most anything in Metal, we need a command queue, which gives us a command buffer, which then allows us to encode commands for Metal to perform. In order to get a command encoder from the command buffer, we need a render pass descriptor. A render pass descriptor contains a set of attachments that represent the destination, or target, of a render pass. In other words, one of the attachments in the render pass descriptor is the color attachment, which is essentially the pixel data of a render pass. The last thing we need is a render pipeline state. This object represents a particular state during a render pass, including the vertex and fragment functions. The next part of the init method of the MetalView sets up these objects:

let library = metalDevice.makeDefaultLibrary()
        
let vertexShader = "basic_vertex"
let fragmentShader = "texture_fragment"
let vertexProgram = library?.makeFunction(name: vertexShader)
let fragmentProgram = library?.makeFunction(name: fragmentShader)
let renderPipelineDescriptor = MTLRenderPipelineDescriptor()
renderPipelineDescriptor.vertexFunction = vertexProgram
renderPipelineDescriptor.fragmentFunction = fragmentProgram
renderPipelineDescriptor.colorAttachments[0].pixelFormat = .bgra8Unorm

commandQueue = metalDevice.makeCommandQueue()
renderPipeline = try? metalDevice.makeRenderPipelineState(descriptor: renderPipelineDescriptor)

renderPassDescriptor.colorAttachments[0].loadAction = .dontCare
renderPassDescriptor.colorAttachments[0].storeAction = .store

First, a library gives us access to the shader functions that were compiled into the application (more on those later). Since all I need Metal to do is to draw a bitmap onto the screen, I only need two simple shader functions: a basic vertex shader, and a fragment shader for texture mapping. A render pipeline descriptor is created in order to make the render pipeline state. Above we can see that the render pipeline state is configured with the two shader functions, and the pixel format for the color attachment. The command queue is simply created from the Metal Device.

The color attachment (i.e. render target for pixel data) of the render pass descriptor is configured for its load and store actions. The load action is performed at the start of a rendering pass, and can be used to clear the attachment to a specific color. Since I will be writing the entire bitmap every frame into the color attachment, there is no need to clear it beforehand. For the store action, I specify that the results of the render pass should be saved in memory to the attachment.

The next, and final, thing that needs to be set up in the init method of the MetalView are the buffer and texture objects required for rendering. I’m not going to go into the details of texture mapping, which is what the buffer and texture objects are required for, as that is just too big of a topic, so I will assume some basic knowledge of UV texture mapping going forward.

First, I define the vertices and UV coordinates of the unit quad primitive for texture mapping (the coordinate system in Metal has +x/y going to the right and up, and -x/y going to the left and down):

fileprivate let unitQuadVertices: [Float] = [
    -1.0,  1.0,  1.0,
    -1.0, -1.0, 1.0,
    1.0, -1.0, 1.0,
    
    -1.0,  1.0,  1.0,
    1.0, -1.0, 1.0,
    1.0, 1.0,  1.0
]

fileprivate let unitQuadUVCoords: [Float] = [
    0.0, 0.0,
    0.0, 1.0,
    1.0, 1.0,
    
    0.0, 0.0,
    1.0, 1.0,
    1.0, 0.0
]

As we can see, these vertices and UV coordinates define two triangles that make up the unit quad. Metal buffers then need to be created to contain this data to send to the GPU:

let vertexBufferSize = MemoryLayout<Float>.size * unitQuadVertices.count
let uvBufferSize = MemoryLayout<Float>.size * unitQuadUVCoords.count
guard let sharedVertexBuffer = metalDevice.makeBuffer(bytes: unitQuadVertices, length: vertexBufferSize, options: .storageModeShared),
    let sharedUVBuffer = metalDevice.makeBuffer(bytes: unitQuadUVCoords, length: uvBufferSize, options: .storageModeShared) else {
        return nil
}

vertexBuffer = metalDevice.makeBuffer(length: vertexBufferSize, options: .storageModePrivate)
uvBuffer = metalDevice.makeBuffer(length: uvBufferSize, options: .storageModePrivate)
guard let vertexBuffer = vertexBuffer, let uvBuffer = uvBuffer else {
    return nil
}

let textureWidth = Int(frame.width)
let textureHeight = Int(frame.height)

guard let commandBuffer = commandQueue?.makeCommandBuffer(), let commandEncoder = commandBuffer.makeBlitCommandEncoder() else {
    return nil
}

commandEncoder.copy(from: sharedVertexBuffer, sourceOffset: 0, to: vertexBuffer, destinationOffset: 0, size: vertexBufferSize)
commandEncoder.copy(from: sharedUVBuffer, sourceOffset: 0, to: uvBuffer, destinationOffset: 0, size: uvBufferSize)
commandEncoder.endEncoding()

commandBuffer.addCompletedHandler { _ in
    let textureDescriptor = MTLTextureDescriptor.texture2DDescriptor(pixelFormat: .rgba8Unorm, width: textureWidth, height: textureHeight, mipmapped: false)
    textureDescriptor.cpuCacheMode = .writeCombined
    textureDescriptor.usage = .shaderRead
    self.texture = metalDevice.makeTexture(descriptor: textureDescriptor)
}
commandBuffer.commit()

Buffers are created by the Metal Device by specifying a length in bytes, and can be initialized with existing data such as the vertex and UV data above. Since this vertex and UV data will never change, access to that memory will be faster if it is transferred to the GPU to have private access exclusive to the GPU. i.e. The CPU does not need to change or do anything with this data after it creates it, so transferring it to the GPU optimizes the render pass since this data won’t have to constantly be copied from the CPU to the GPU every frame. To copy the vertex data to the GPU, I set up a command encoder and issue commands to copy the data from one buffer to the other that was initialized with storageModePrivate access. This is done for both the vertex and UV buffers. By adding a completion handler to the command buffer, I can be notified when this process is done, and then proceed to set up the texture object that will be passed to the fragment shader.

The Metal texture is created from a texture descriptor, which has been created with the width and height and pixel format of the texture. Some additional properties are configured for optimization purposes. The writeCombined option tells Metal that this texture will only be written to by the CPU, while the shaderRead option indicates that the fragment shader will only ever read from the texture. This texture will eventually contain the rendered bitmap from the game that will be displayed on screen.

Now let’s see how this is all put together in the renderFrame method of the MetalView class:

public func renderFrame(platformTexture: PlatformTexture) {
    guard let metalLayer = layer as? CAMetalLayer, let drawable = metalLayer.nextDrawable() else {
        return
    }
    
    semaphore.wait()
    renderPassDescriptor.colorAttachments[0].texture = drawable.texture;
    
    if let tex = texture, let textureBytes = platformTexture.texture {
        let region = MTLRegionMake2D(0, 0, tex.width, tex.height)
        tex.replace(region: region, mipmapLevel: 0, withBytes: textureBytes, bytesPerRow: platformTexture.bytesPerRow)
    }
    
    guard let commandBuffer = commandQueue?.makeCommandBuffer(),
        let commandEncoder = commandBuffer.makeRenderCommandEncoder(descriptor: renderPassDescriptor),
        let renderPipeline = renderPipeline else {
            semaphore.signal()
            return
    }
    
    commandEncoder.setRenderPipelineState(renderPipeline)
    commandEncoder.setVertexBuffer(vertexBuffer, offset: 0, index: 0)
    commandEncoder.setVertexBuffer(uvBuffer, offset: 0, index: 1)
    commandEncoder.setFragmentTexture(texture, index: 0)
    commandEncoder.drawPrimitives(type: .triangle, vertexStart: 0, vertexCount: 6)
    commandEncoder.endEncoding()

    commandBuffer.addCompletedHandler { _ in
        self.semaphore.signal()
    }
    
    commandBuffer.present(drawable)
    commandBuffer.commit()
}

In order to draw to the Metal layer of the MetalView, we need a drawable from it. The texture of that drawable is then assigned to the color attachment of the render pass descriptor, which contains the target attachments for the render pass. This effectively says “store the result of this render pass into the drawable texture of the view’s Metal layer”. Next, I copy the texture bytes of the PlatformTexture from the game into the Metal texture object that will be passed to the fragment shader. Following that, a set of render commands are issued to the GPU: set the current pipeline state (containing the vertex and fragment functions to run), assign the vertex and UV buffers for the vertex stage, assign the texture for the fragment stage, draw the unit quad primitive as two triangles, and then finalize and commit the commands. The semaphore is used to ensure the render pass has completed before beginning a new one.

Finally, Metal shader functions go into a file with a .metal extension and are compiled as part of the build process. The shaders I use for my implementation are very straightforward:

using namespace metal;

struct VertexOut {
    float4 pos [[ position ]];
    float2 uv;
};

vertex VertexOut basic_vertex(constant packed_float3 *vertexArray [[ buffer(0) ]],
                              constant packed_float2 *uvData [[ buffer(1) ]],
                              ushort vid [[ vertex_id ]])
{
    VertexOut out;
    out.pos = float4(vertexArray[vid], 1.f);
    out.uv = uvData[vid];
    return out;
}

fragment float4 texture_fragment(VertexOut f [[ stage_in ]],
                                 texture2d<float> texture [[ texture(0) ]])
{
    constexpr sampler s(mag_filter::nearest, min_filter::nearest);
    float4 sample = texture.sample(s, f.uv);
    return sample;
}

The vertex shader simply assigns the incoming vertex and UV coordinates to the VertexOut type for each vertex in the draw call. The fragment shader does the simples texture mapping, using nearest filtering since the size of the unit quad primitive and the texture are exactly the same (i.e. the mapping from the texture to the quad primitive is 1-1).

That concludes this part, covering the graphics implementation of my custom game engine on iOS. For more information on writing a good software renderer, check out early episodes of Handmade Hero — a great series that inspired and informed me in the making of my game.

In the next part, I will be covering the other critical piece in any game: audio. For now, here is a short demo of a bunch of triangles (running at a lovely 60fps!):

Custom Game Engine on iOS: The Platform Layer

Video games are what got me interested in programming. I suspect that is true for many programmers. And although I’m not programming games professionally in my career, I still find time to work on my own game as a hobby project. It’s truly rewarding and very enjoyable to have a fun side project to work on that challenges me in different ways than my job does. This particular game has been keeping me busy for the past few years (working on something so complicated part-time is quite time-consuming!), but it’s at a stage now that feels like an actual playable game. As such I’ve been thinking about platforms it would be well-suited for, and touch screens like tablets and phones are a great fit. All development up to this point has been on Mac and Windows, but I became more and more curious to get a sense of what it would feel like on a touch screen, so I finally decided to get the game running on iOS.

Now that I’ve completed the first pass of my iOS platform layer, I thought it would be interesting to detail what went in to making it work, and how a game engine might look on iOS. Of course there are many different ways this can be done; this is just how I did it, and what works for me and the game I am making. Hopefully this knowledge can be helpful and inspiring in some way.

This first part will cover setting up the larger platform layer architecture and what was needed in order to have my game talk to iOS and vice versa. Following parts will go more into detail on using Metal for graphics and Core Audio for, well.. audio. First, however, it’s important to get a view of how the game itself fits into the iOS layer.

The entire game architecture can be split into two main layers: the game layer and the platform layer. The iOS version adds a third intermediate layer as we will shortly see, but broadly speaking, this is how I see the overall structure. The vast bulk of the code exists in the game layer with a minimal amount of code existing in the platform layer that is required for the game to talk to the operating system and vice versa. This has made the initial port to iOS relatively easy and quick.

One of the first things any application needs on any OS is a window, and it’s no different for a game. On iOS we can create a window in the AppDelegate:

@UIApplicationMain
class AppDelegate: UIResponder, UIApplicationDelegate {
    var window: UIWindow?

    func application(_ application: UIApplication, didFinishLaunchingWithOptions launchOptions: [UIApplication.LaunchOptionsKey: Any]?) -> Bool {
        let screen = UIScreen.main
        window = UIWindow(frame: screen.bounds)
        window?.rootViewController = ViewController()
        window?.makeKeyAndVisible()

        return true
    }
}

This should look familiar to any iOS developer. We create a window with the same bounds as the main screen, set the root ViewController, and then basically show the window. In the ViewController we need to create the view itself, which is what the game will draw into, and is ultimately what is displayed to the user. To do this, we override loadView:

class ViewController: UIViewController {
    let metalDevice = MTLCreateSystemDefaultDevice()

    override func loadView() {
        var metalView: MetalView?
        if let metalDevice = metalDevice {
            metalView = MetalView(metalDevice: metalDevice)
        }

        view = metalView ?? UIView(frame: UIScreen.main.bounds)
        view.backgroundColor = UIColor.clear
    }
}

I use Metal to display the bitmap for each frame, so for that I set up a Metal-backed view and assign it to the ViewController‘s view property (in case that fails or the device doesn’t support Metal, a normal UIView can be set instead to at least prevent the game from crashing). I’ll be going into more detail on how the Metal view works in the next part of this series.

Just as a small little detail, I don’t want the status bar shown in my game, so I override a property on the ViewController to hide it:

override var prefersStatusBarHidden: Bool { true }

override func viewWillAppear(_ animated: Bool) {
    super.viewWillAppear(animated)
    setNeedsStatusBarAppearanceUpdate()
}

With those core elements set up (a window and a view that will contain the game), it’s time to look into how to integrate the game layer into the platform layer.

The first order of business is dealing with the fact that the platform layer is written in Swift while the game layer is written entirely in C++. Interoperability between Swift and C is relatively painless, but Swift cannot interoperate with C++, so this means I need a C interface as a bridge between the game and the platform. This is what I meant by the extra intermediate layer I mentioned above being required for the iOS version. I didn’t want to convert any of my existing game code into a C interface, so instead I created a .h/.cpp file pair in  my iOS project where the .h file is a pure C interface and the .cpp file wraps the calls to the actual game as well as implementing some of the lower-level platform functionality like threads and file I/O.

Here is what part of the .h interface file looks like:

#ifdef __cplusplus
extern "C" {
#endif

enum TouchPhase {
    BEGIN, MOVE, END
};

#pragma mark - Platform
bool ios_platform_initialize(uint32_t threadCount);
void ios_platform_shutdown();

#pragma mark - Game
void ios_game_startup();
void ios_game_shutdown();
void ios_begin_frame();
void ios_end_frame();

#pragma mark - Input
void ios_input_reset();
void ios_input_add_touch(float x, float y, enum TouchPhase phase);

#ifdef __cplusplus
}
#endif

Here is a sample of the corresponding .cpp file:

#include <dispatch/dispatch.h>
#include <mach/mach.h>
#include <mach/mach_time.h>
#include <unistd.h>

#include "bullet_beat_ios.h"
#include "../../Source/bullet_beat.h"

static bbGameMemory gameMemory;
static bbPlatform platform;
static bbThreadPool threadPool;

bool
ios_platform_initialize(uint32_t threadCount) {
    vm_address_t baseAddress = 0;
    size_t memorySize = fsMegabytes(256);
    kern_return_t result = vm_allocate((vm_map_t)mach_task_self(), &baseAddress, memorySize, VM_FLAGS_ANYWHERE);
    if (result == KERN_SUCCESS) {
        gameMemory.init((void *)baseAddress, memorySize);
    }
    
    mach_timebase_info_data_t machTimebaseInfo;
    mach_timebase_info(&machTimebaseInfo);
    timebaseFreq = ((float)machTimebaseInfo.denom / (float)machTimebaseInfo.numer * 1.0e9f);
    
    // Additional setup
    
    if (ios_initialize_thread_pool(&threadPool, threadCount)) {
        platform.threadPool = &threadPool;
    } else {
        return false;
    }
    
    return gameMemory.is_valid();
}

void
ios_platform_shutdown() {
    ios_free_thread_pool(&threadPool);
}

void
ios_game_startup() {
    game_startup(&platform);
}

void
ios_game_shutdown() {
    game_shutdown(&platform);
}

In addition to including some system header files and the corresponding .h file for the C interface, I also include the main header file for the game so I can call directly into the game from this .cpp file. This file also statically defines some game layer structures that the platform layer needs access to, made possible by including the game’s main header file. The ios_platform_initialize function allocates memory, initializes the worker thread pool, as well as some additional work that we will see later. The ios_game_startup and ios_game_shutdown functions just forward their calls to the actual game. In order to expose the C interface to Swift, we make use of a module map. The Clang documentation defines module maps as “the crucial link between modules and headers,” going on to say that they describe how headers map onto the logical structure of a module. C/C++ code is treated as a module by Swift, and a module map describes the mapping of the interface into that module. The file itself is actually very simple in my case:

module Game {
    header "bullet_beat_ios.h"
    export *
}

That’s it! The file is required to have a .modulemap suffix, and it is placed in the same directory as the .h interface file (the header declaration specifies the relative path to the location of the module map file). Xcode also needs to know about this file, so the directory were it is located is specified in the “Import Paths” build setting under “Swift Compiler – Search Paths”. I can now import the “Game” module into any Swift file, which allows me to call any C function exposed by the .h file in that Swift file.

For instance, the AppDelegate‘s launch method can now be expanded to include platform initialization:

import UIKit
import Game

func application(_ application: UIApplication, didFinishLaunchingWithOptions launchOptions: [UIApplication.LaunchOptionsKey: Any]?) -> Bool {
    let processInfo = ProcessInfo.processInfo
    let threadCount = max(processInfo.processorCount - 2, 2)
    if ios_platform_initialize(UInt32(threadCount)) {
        if let exeUrl = Bundle.main.executableURL {
            let appDir = exeUrl.deletingLastPathComponent()
            let fileManager = FileManager.default
            if fileManager.changeCurrentDirectoryPath(appDir.path) {
                print("[BulletBeat] Working directory: ", fileManager.currentDirectoryPath)
            }
        }
    }
    
    // Additional initialization
    
    ios_game_startup()
    
    let screen = UIScreen.main
    window = UIWindow(frame: screen.bounds)
    window?.rootViewController = ViewController()
    window?.makeKeyAndVisible()
    
    return true
}

The shutdown work goes into the applicationWillTerminate callback:

func applicationWillTerminate(_ application: UIApplication) {
    // Additional shutdown work
    ios_game_shutdown()
    ios_platform_shutdown()
}

With this, the platform can talk to the game, but what about the game talking to the platform? The game needs several services from the platform layer, including getting the path to save game location, disabling/enabling the idle timer (iOS only), hiding/showing the cursor (desktops only), file I/O, etc. A good way of doing this is through function pointers that are assigned by the platform layer. As we saw in the .cpp file above, it defines a static bbPlatform struct, and it contains a bunch of function pointers that the game requires in order to talk to the platform. These are assigned during platform initialization.

For example, here are some of the services declared in the bbPlatform struct that need to be assigned functions:

#if FS_PLATFORM_OSX || FS_PLATFORM_IOS
typedef FILE* bbFileHandle;
#elif FS_PLATFORM_WINDOWS
typedef HANDLE bbFileHandle;
#endif

typedef void(*platform_call_f)(void);
typedef const char*(*platform_get_path_f)(void);
typedef bbFileHandle(*platform_open_file_f)(const char*, const char*);
typedef bool(*platform_close_file_f)(bbFileHandle);

struct bbPlatform {
    bbThreadPool *threadPool;
    
    platform_call_f hide_cursor;
    platform_call_f show_cursor;
    platform_call_f disable_sleep;
    platform_call_f enable_sleep;
    platform_get_path_f get_save_path;
    platform_open_file_f open_file;
    platform_close_file_f close_file;
};

Some of these are not applicable to iOS (like hide/show cursor), so they will just be assigned stubs. The open/close file functions can be declared directly in the .cpp file:

static FILE*
ios_open_file(const char *path, const char *mode) {
    FILE *f = fopen(path, mode);
    return f;
}

static bool
ios_close_file(FILE *file) {
    int result = fclose(file);
    return (result == 0);
}

They are then assigned in the ios_platform_initialize function seen above:

platform.open_file = ios_open_file;
platform.close_file = ios_close_file;

Others like those dealing with the idle timer and getting the save game directory path need to be defined in the Swift platform layer (in my case in the AppDelegate file):

fileprivate func ios_disable_sleep() {
    let app = UIApplication.shared
    app.isIdleTimerDisabled = true
}

fileprivate func ios_enable_sleep() {
    let app = UIApplication.shared
    app.isIdleTimerDisabled = false
}


fileprivate let saveUrl: URL? = {
    let fileManager = FileManager.default
    do {
        var url = try fileManager.url(for: .applicationSupportDirectory, in: .userDomainMask, appropriateFor: nil, create: true)
        url = url.appendingPathComponent("Bullet Beat", isDirectory: true)
        if !fileManager.fileExists(atPath: url.path) {
            try fileManager.createDirectory(at: url, withIntermediateDirectories: true, attributes: nil)
        }
        return url
    } catch {
        return nil
    }
}()

fileprivate func ios_get_save_path() -> UnsafePointer<Int8>? {
    return saveUrl?.path.utf8CString.withUnsafeBytes({ ptr -> UnsafePointer<Int8>? in
        return ptr.bindMemory(to: Int8.self).baseAddress
    })
}

They are assigned just after the call to initialize the platform by calling C functions through the bridging interface:

if ios_platform_initialize(UInt32(threadCount)) {
    // Other initialization work
    ios_platform_set_get_save_path_function(ios_get_save_path)
    ios_platform_set_disable_sleep_function(ios_disable_sleep)
    ios_platform_set_enable_sleep_function(ios_enable_sleep)
}

The actual assignment to the bbPlatform struct is handled in the .cpp file:

void ios_platform_set_get_save_path_function(const char*(*func)(void)) { 
    platform.get_save_path = func;
}

void ios_platform_set_disable_sleep_function(void(*func)(void)) { 
    platform.disable_sleep = func;
}

void ios_platform_set_enable_sleep_function(void(*func)(void)) { 
    platform.enable_sleep = func;
}

Once assigned, these function pointers are simply called within the game layer like this:

bbPlatform *platform = ...
const char *savePath = platform->get_save_path();
...
bbFileHandle *file = platform->open_file("/path/to/file", "r");
...

Before ending this part, there are two more critical pieces that the platform layer needs to do: input and the game loop. Touch gestures need to be recorded and mapped to the game’s input struct. And lastly, the platform layer needs to set up the game loop — synchronized to 60fps — that will call the game’s update function to simulate one frame of the game.

Input is (so far) very straightforward in my case; I just need a touch down and touch up event. I look for these by overriding the touches methods of the ViewController:

override func touchesBegan(_ touches: Set<UITouch>, with event: UIEvent?) {
    for touch in touches {
        let point = touch.location(in: view)
        ios_input_add_touch(Float(point.x), Float(point.y), BEGIN)
    }
}

override func touchesMoved(_ touches: Set<UITouch>, with event: UIEvent?) {
    for touch in touches {
        let point = touch.location(in: view)
        ios_input_add_touch(Float(point.x), Float(point.y), MOVE)
    }
}

override func touchesEnded(_ touches: Set<UITouch>, with event: UIEvent?) {
    for touch in touches {
        let point = touch.location(in: view)
        ios_input_add_touch(Float(point.x), Float(point.y), END)
    }
}

override func touchesCancelled(_ touches: Set<UITouch>, with event: UIEvent?) {
    ios_input_reset();
}

These methods just call a function in the bridging platform layer to add touch events as they come in. The BEGIN/MOVE/END enums here are declared in the .h file. The touches are placed into an input buffer which is reset at the end of each frame:

struct TouchInput {
    struct Touch {
        float x, y;
        TouchPhase phase;
    };
    
    Touch touches[4];
    fsi32 index;
};

static TouchInput touchInput;

void
ios_input_reset() {
    touchInput.index = -1;
}

void
ios_input_add_touch(float x, float y, enum TouchPhase phase) {
    if (++touchInput.index < ARRAY_COUNT(touchInput.touches)) { TouchInput::Touch *touch = &touchInput.touches[touchInput.index]; touch->x = x;
        touch->y = y;
        touch->phase = phase;
    }
}

For now, I just grab the first touch recorded and map it to the game’s input struct. For the time, I don’t need anything more complicated, so I’m just keeping it as simple as possible for now. If, or when, I need to expand it, I can make use of the input buffer to keep touches around for some number of frames and then determine different gestures that way.

switch (touch->phase) {
    case BEGIN:
        input.leftMouseWentDown = true;
        break;

    case MOVE:
        break;

    case END:
        input.leftMouseWentUp = true;
        break;

    default:
        break;
}

input.mouse.x = touch->x;
input.mouse.y = touch->y;

And finally, the game loop. For this I use a CADisplayLink from the CoreAnimation framework that lets me specify a callback that is called at the rate of the screen’s refresh rate — 60Hz, or 60fps.

class ViewController: UIViewController {
    weak var displayLink: CADisplayLink?

    override func viewDidLoad() {
        super.viewDidLoad()
        
        // Other initialization work
        
        startGame()
    }

    func startGame() {
        ios_input_reset();
        
        displayLink = UIScreen.main.displayLink(withTarget: self, selector: #selector(getFrame(_:)))
        displayLink?.add(to: RunLoop.current, forMode: .default)
    }
    
    func stopGame() {
        displayLink?.invalidate()
    }
    
    @objc private func getFrame(_ sender: CADisplayLink) {
        ios_begin_frame()
        
        let dt = Float(sender.targetTimestamp - sender.timestamp)
        
        // Simulate one game frame and then render it to the view
        
        ios_end_frame()
    }
}

The startGame and stopGame methods of the ViewController are also called in the AppDelegate as part of the lifecycle of the app. When the user sends it to the background, stop the game, and when it’s coming back to the foreground (i.e. the game still exists in memory and is not being freshly launched), start it up again.

func applicationWillEnterForeground(_ application: UIApplication) {    
    if let vc = window?.rootViewController as? ViewController {
        vc.startGame()
    }
}

func applicationDidEnterBackground(_ application: UIApplication) {
    if let vc = window?.rootViewController as? ViewController {
        vc.stopGame()
    }
}

Finally, here is a visual representation of the overall structure:

Structural layers

Structural layers of the overall architecture of porting my custom game engine to iOS

That’s it for the overall architecture of how I ported my game to iOS. In the next part I will be discussing graphics and how the game renders each frame to the screen. Following that I will cover how the game sends audio to the platform for output through the speakers.

Cheers!

Dynamics Processing: Compressor/Limiter, part 2

In part 1 I detailed how I built the envelope detector that I will now use in my Unity compressor/limiter. To reiterate, the envelope detector extracts the amplitude contour of the audio that will be used by the compressor to determine when to compress the signal’s gain. The response of the compressor is determined by the attack time and the release time of the envelope, with higher values resulting in a smoother envelope, and hence, a gentler response in the compressor.

The compressor script is a MonoBehaviour component that can be attached to any GameObject. Here are the fields and corresponding inspector GUI:

public class Compressor : MonoBehaviour
{
    [AudioSlider("Threshold (dB)", -60f, 0f)]
    public float threshold = 0f;		// in dB
    [AudioSlider("Ratio (x:1)", 1f, 20f)]
    public float ratio = 1f;
    [AudioSlider("Knee", 0f, 1f)]
    public float knee = 0.2f;
    [AudioSlider("Pre-gain (dB)", -12f, 24f)]
    public float preGain = 0f;			// in dB, amplifies the audio signal prior to envelope detection.
    [AudioSlider("Post-gain (dB)", -12f, 24f)]
    public float postGain = 0f;			// in dB, amplifies the audio signal after compression.
    [AudioSlider("Attack time (ms)", 0f, 200f)]
    public float attackTime = 10f;		// in ms
    [AudioSlider("Release time (ms)", 10f, 3000f)]
    public float releaseTime = 50f;		// in ms
    [AudioSlider("Lookahead time (ms)", 0, 200f)]
    public float lookaheadTime = 0f;	// in ms

    public ProcessType processType = ProcessType.Compressor;
    public DetectionMode detectMode = DetectionMode.Peak;

    private EnvelopeDetector[] m_EnvelopeDetector;
    private Delay m_LookaheadDelay;

    private delegate float SlopeCalculation (float ratio);
    private SlopeCalculation m_SlopeFunc;
    
    // Continued...
Compressor/Limiter Unity inspector GUI.

Compressor/Limiter Unity inspector GUI.

Compressor/Limiter Unity inspector GUI.

Compressor/Limiter Unity inspector GUI.


The two most important parameters for a compressor are the threshold and the ratio values. When a signal exceeds the threshold, the compressor reduces the level of the signal by the given ratio. For example, if the threshold is -2 dB with a ratio of 4:1 and the compressor encounters a signal peak of +2 dB, the gain reduction will be 3 dB, resulting in the signal’s new level of -1dB. The ratio is just a percentage, so a 4:1 ratio means that the signal will be reduced by 75% (1 – 1/4 = 0.75). The difference between the threshold and the signal peak (which is 4 dB in this example) is scaled by the ratio to arrive at the 3 dB reduction (4 * 0.75 = 3). When the ratio is ∞:1, the compressor is turned into a limiter. The compressor’s output can be visualized by a plot of amplitude in vs. amplitude out:

Plot of amplitude in vs. amplitdue out of a compressor with 4:1 ratio.

Plot of amplitude in vs. amplitdue out of a compressor with 4:1 ratio.

When the ratio is ∞:1, the resulting amplitude after the threshold would be a straight horizontal line in the above plot, effectively preventing any levels from exceeding the threshold. It can easily be seen how this then would exhibit the behavior of a limiter. From these observations, we can derive the equations we need for the compressor.

compressor gain = slope * (threshold – envelope value) if envelope value >= threshold, otherwise 0

slope = 1 – (1 / ratio), or for limiting, slope = 1

All amplitude values are in dB for these equations. We saw both of these equations earlier in the example I gave, and both are pretty straightforward. These elements can now be combined to make up the compressor/limiter. The Awake method is called as soon as the component is initialized in the scene.


void Awake ()
{
    if (processType == ProcessType.Compressor) {
        m_SlopeFunc = CompressorSlope;
    } else if (processType == ProcessType.Limiter) {
        m_SlopeFunc = LimiterSlope;
    }

    // Convert from ms to s.
    attackTime /= 1000f;
    releaseTime /= 1000f;

    // Handle stereo max number of channels for now.
    m_EnvelopeDetector = new EnvelopeDetector[2];
    m_EnvelopeDetector[0] = new EnvelopeDetector(attackTime, releaseTime, detectMode, sampleRate);
    m_EnvelopeDetector[1] = new EnvelopeDetector(attackTime, releaseTime, detectMode, sampleRate);
}

Here is the full compressor/limiter code in Unity’s audio callback method. When placed on a component with the audio listener, the data array will contain the audio signal prior to being sent to the system’s output.

void OnAudioFilterRead (float[] data, int numChannels)
{
    float postGainAmp = AudioUtil.dB2Amp(postGain);

    if (preGain != 0f) {
        float preGainAmp = AudioUtil.dB2Amp(preGain);
        for (int k = 0; k < data.Length; ++k) {
            data[k] *= preGainAmp;
        }
    }

    float[][] envelopeData = new float[numChannels][];

    if (numChannels == 2) {
        float[][] channels;
        AudioUtil.DeinterleaveBuffer(data, out channels, numChannels);
        m_EnvelopeDetector[0].GetEnvelope(channels[0], out envelopeData[0]);
        m_EnvelopeDetector[1].GetEnvelope(channels[1], out envelopeData[1]);
        for (int n = 0; n < envelopeData[0].Length; ++n) {
            envelopeData[0][n] = Mathf.Max(envelopeData[0][n], envelopeData[1][n]);
        }
    } else if (numChannels == 1) {
        m_EnvelopeDetector[0].GetEnvelope(data, out envelopeData[0]);
    } else {
        // Error...
    }

    m_Slope = m_SlopeFunc(ratio);

    for (int i = 0, j = 0; i < data.Length; i+=numChannels, ++j) {
        m_Gain = m_Slope * (threshold - AudioUtil.Amp2dB(envelopeData[0][j]));
        m_Gain = Mathf.Min(0f, m_Gain);
        m_Gain = AudioUtil.dB2Amp(m_Gain);
        for (int chan = 0; chan < numChannels; ++chan) {
            data[i+chan] *= (m_Gain * postGainAmp);
        }
    }
}

And quickly, here is the helper method for deinterleaving a multichannel buffer:

public static void DeinterleaveBuffer (float[] source, out float[][] output, int sourceChannels)
{
    int channelLength = source.Length / sourceChannels;

    output = new float[sourceChannels][];

    for (int i = 0; i < sourceChannels; ++i) {
        output[i] = new float[channelLength];

        for (int j = 0; j < channelLength; ++j) {
            output[i][j] = source[j*sourceChannels+i];
        }
    }
}

First off, there are a few utility functions that I included in the component that converts between linear amplitude and dB values that we can see in the function above. Pre-gain is applied to the audio signal prior to extracting the envelope. For multichannel audio, Unity unfortunately gives us an interleaved buffer, so this needs to be deinterleaved before sending it to the envelope detector (recall that the detector uses a recursive filter and thus has state variables. This could of course be handled differently in the envelope detector, but it’s simpler to work on single continuous data buffers).

When working with multichannel audio, each channel will have a unique envelope. These could of course be processed separately, but this will result in the relative levels between the channels to be disturbed. Instead, I take the maximum envelope value and use that for the compressor. Another option would be to take the average of the two.

I then calculate the slope value based on whether the component is set to compressor or limiter mode (via a function delegate). The following loop is just realizing the equations posted earlier, and converting the dB gain value to linear amplitude before applying it to the audio signal along with post-gain.

This completes the compressor/limiter component. However, there are two important elements missing: soft knee processing, and lookahead. From the plot earlier in the post, we see that once the signal reaches the threshold, the compressor kicks in rather abruptly. This point is called the knee of the compressor, and if we want this transition to happen more gently, we can interpolate within a zone around the threshold.

It’s common, especially in limiters, to have a lookahead feature that compensates for the obvious lag of the envelope detector. In other words, when the attack and release times are non-zero, the resulting envelope lags behind the audio signal as a result of the filtering. The compressor/limiter will actually miss attenuating the peaks in the signal that it needs to because of this lag. That’s where lookahead comes in. In truth, it’s a bit of a misnomer because we can obviously not see into the future of an audio signal, but we can delay the audio to achieve the same effect. This means that we extract the envelope as normal, but delay the audio output so that the compressor gain value lines up with the audio peaks that it is meant to attenuate.

I will be implementing these two remaining features in a future post.

Dynamics processing: Compressor/Limiter, part 1

Lately I’ve been busy developing an audio-focused game in Unity, whose built-in audio engine is notorious for being extremely basic and lacking in features. (As of this writing, Unity 5 has not yet been released, in which its entire built-in audio engine is being overhauled). For this project I have created all the DSP effects myself as script components, whose behavior is driven by Unity’s coroutines. In order to have slightly more control over the final mix of these elements, it became clear that I needed a compressor/limiter. This particular post is written with Unity/C# in mind, but the theory and code is easy enough to adapt to other uses. In this first part we’ll be looking at writing the envelope detector, which is needed by the compressor to do its job.

An envelope detector (also called a follower) extracts the amplitude envelope from an audio signal based on three parameters: an attack time, release time, and detection mode. The attack/release times are fairly straightforward, simply defining how quickly the detection responds to rising and falling amplitudes. There are typically two modes of calculating the envelope of a signal: by its peak value or its root mean square value. A signal’s peak value is just the instantaneous sample value while the root mean square is measured over a series of samples, and gives a more accurate account of the signal’s power. The root mean square is calculated as:

rms = sqrt ( (1/n) * (x12 + x22 + … + xn2) ),

where n is the number of data values. In other words, we sum together the squares of all the sample values in the buffer, find the average by dividing by n, and then taking the square root. In audio processing, however, we normally bound the sample size (n) to some fixed number (called windowing). This effectively means that we calculate the RMS value over the past n samples.

(As an aside, multiplying by 1/n effectively assigns equal weights to all the terms, making it a rectangular window. Other window equations can be used instead which would favor terms in the middle of the window. This results in even greater accuracy of the RMS value since brand new samples (or old ones at the end of the window) have less influence over the signal’s power.)

Now that we’ve seen the two modes of detecting a signal’s envelope, we can move on to look at the role of the attack/release times. These values are used in calculating coefficients for a first-order recursive filter (also called a leaky integrator) that processes the values we get from the audio buffer (through one of the two detection methods). Simply stated, we get the sample values from the audio signal and pass them through a low-pass filter to smooth out the envelope.

We calculate the coefficients using the time-constant equation:

g = e ^ ( -1 / (time * sample rate) ),

where time is in seconds, and sample rate in Hz. Once we have our gain coefficients for attack/release, we put them into our leaky integrator equation:

out = in + g * (out – in),

where in is the input sample we detected from the incoming audio, g is either the attack or release gain, and out is the envelope sample value. Here it is in code:

public void GetEnvelope (float[] audioData, out float[] envelope)
{
    envelope = new float[audioData.Length];

    m_Detector.Buffer = audioData;

    for (int i = 0; i < audioData.Length; ++i) {
        float envIn = m_Detector[i];

        if (m_EnvelopeSample < envIn) {
            m_EnvelopeSample = envIn + m_AttackGain * (m_EnvelopeSample - envIn);
        } else {
            m_EnvelopeSample = envIn + m_ReleaseGain * (m_EnvelopeSample - envIn);
        }

        envelope[i] = m_EnvelopeSample;
    }
}

(Source: code is based on “Envelope detector” from http://www.musicdsp.org/archive.php?classid=2#97, with detection modes added by me.)

The envelope sample is calculated based on whether the current audio sample is rising or falling, with the envIn sample resulting from one of the two detection modes. This is implemented similarly to what is known as a functor in C++. I prefer this method to having another branching structure inside the loop because among other things, it’s more extensible and results in cleaner code (as well as being modular). It could be implemented using delegates/function pointers, but the advantage of a functor is that it retains its own state, which is useful for the RMS calculation as we will see. Here is how the interface and classes are declared for the detection modes:

public interface IEnvelopeDetection
{
    float[] Buffer { set; get; }
    float this [int index] { get; }

    void Reset ();
}

We then have two classes that implement this interface, one for each mode:

A signal’s peak value is the instantaneous sample value while the root mean square is measured over a series of samples, and gives a more accurate account of the signal’s power.

public class DetectPeak : IEnvelopeDetection
{
    private float[] m_Buffer;

    /// <summary>
    /// Sets the buffer to extract envelope data from. The original buffer data is held by reference (not copied).
    /// </summary>
    public float[] Buffer
    {
        set { m_Buffer = value; }
        get { return m_Buffer; }
    }

    /// <summary>
    /// Returns the envelope data at the specified position in the buffer.
    /// </summary>
    public float this [int index]
    {
        get { return Mathf.Abs(m_Buffer[index]); }
    }

    public DetectPeak () {}
    public void Reset () {}
}

This particular class involves a rather trivial operation of just returning the absolute value of a signal’s sample. The RMS detection class is more involved.

/// <summary>
/// Calculates and returns the root mean square value of the buffer. A circular buffer is used to simplify the calculation, which avoids
/// the need to sum up all the terms in the window each time.
/// </summary>
public float this [int index]
{
    get {
        float sampleSquared = m_Buffer[index] * m_Buffer[index];
        float total = 0f;
        float rmsValue;

        if (m_Iter < m_RmsWindow.Length-1) {
            total = m_LastTotal + sampleSquared;
            rmsValue = Mathf.Sqrt((1f / (index+1)) * total);
        } else {
            total = m_LastTotal + sampleSquared - m_RmsWindow.Read();
            rmsValue = Mathf.Sqrt((1f / m_RmsWindow.Length) * total);
        }

        m_RmsWindow.Write(sampleSquared);
        m_LastTotal = total;
        m_Iter++;

        return rmsValue;
    }
}

public DetectRms ()
{
    m_Iter = 0;
    m_LastTotal = 0f;
    // Set a window length to an arbitrary 128 for now.
    m_RmsWindow = new RingBuffer<float>(128);
}

public void Reset ()
{
    m_Iter = 0;
    m_LastTotal = 0f;
    m_RmsWindow.Clear(0f);
}

The RMS calculation in this class is an optimization of the general equation I stated earlier. Instead of continually summing together all the  values in the window for each new sample, a ring buffer is used to save each new term. Since there is only ever 1 new term to include in the calculation, it can be simplified by storing all the squared sample values in the ring buffer and using it to subtract from our previous total. We are just left with a multiply and square root, instead of having to redundantly add together 128 terms (or however big n is). An iterator variable ensures that the state of the detector remains consistent across successive audio blocks.

In the envelope detector class, the detection mode is selected by assigning the corresponding class to the ivar:

public class EnvelopeDetector
{
    protected float m_AttackTime;
    protected float m_ReleaseTime;
    protected float m_AttackGain;
    protected float m_ReleaseGain;
    protected float m_SampleRate;
    protected float m_EnvelopeSample;

    protected DetectionMode m_DetectMode;
    protected IEnvelopeDetection m_Detector;

    // Continued...
public DetectionMode DetectMode
{
    get { return m_DetectMode; }
    set {
        switch(m_DetectMode) {
            case DetectionMode.Peak:
                m_Detector = new DetectPeak();
                break;

            case DetectionMode.Rms:
                m_Detector = new DetectRms();
                break;
        }
    }
}

Now that we’ve looked at extracting the envelope from an audio signal, we will look at using it to create a compressor/limiter component to be used in Unity. That will be upcoming in part 2.

Beat Synchronization in Unity

Update

Due to some valuable advice (courtesy of Tazman-audio), I’ve made a few small changes that ensure that synchronization stays independent of framerate. My original strategy for handling this issue was to grab the current sample of the audio source’s playback and compare that to the next expected beat’s sample value (discussed in more detail below). Although this was working fine, Unity’s documentation makes little mention as to the accuracy of this value, aside from it being more preferrable than using Time.time.  Furthermore, the initial synch with the start of audio playback and the BeatCheck function would suffer from some, albeit very small, discrepancy.

Here is the change to the Start method in the “BeatSynchronizer” script that enforces synching with the start of the audio:

public float bpm = 120f; // Tempo in beats per minute of the audio clip.
public float startDelay = 1f; // Number of seconds to delay the start of audio playback.
public delegate void AudioStartAction(double syncTime);
public static event AudioStartAction OnAudioStart;

void Start ()
{
    double initTime = AudioSettings.dspTime;
    audio.PlayScheduled(initTime + startDelay);
    if (OnAudioStart != null) {
        OnAudioStart(initTime + startDelay);
    }
}

The PlayScheduled method starts the audio clip’s playback at the absolute time (on the audio system’s dsp timeline) given in the function argument. The correct start time is then this initial value plus the given delay. This same value is then broadcast to all the beat counters that have subscribed to the AudioStartAction event, which ensures their alignment with the audio.

This necessitated a small change to the BeatCheck method as well, as can be seen below.  The current sample is now calculated using the audio system’s dsp time instead of the clip’s sample position, which also aleviated the need for wrapping the current sample position when the audio clip loops.

IEnumerator BeatCheck ()
{
    while (audioSource.isPlaying) {
        currentSample = (float)AudioSettings.dspTime * audioSource.clip.frequency;

        if (currentSample >= (nextBeatSample + sampleOffset)) {
            foreach (GameObject obj in observers) {
                obj.GetComponent<BeatObserver>().BeatNotify(beatType);
            }
            nextBeatSample += samplePeriod;
        }

        yield return new WaitForSeconds(loopTime / 1000f);
    }
}

Lastly, I decided to add a nice feature to the beat synchronizer that allows you to scale up the the beat values by an integer constant. This is very useful for cases where you might want to synch to beats that transcend one measure. For example, you could synchronize to the downbeat of the second measure of a four-measure group by selecting the following values in the inspector:

Scaling up the beat values by a factor of 4 treats each beat as a measure instead of a single beat (assuming 4/4 time).

Scaling up the beat values by a factor of 4 treats each beat as a measure instead of a single beat (assuming 4/4 time).

This same feature exists for the pattern counter as well, allowing great deal of flexibility and control over what you can synchronize to.  There is a new example scene in the project demonstrating this.

Github project here.

I did, however, come across a possible bug in the PlayScheduled function: a short burst of noise can be heard occasionally when running a scene. I’ve encountered this both in the Unity editor (version 4.3.3) and in the build product. This does not happen when starting the audio using Play or checking “Play On Awake”.

Original Post

Lately I’ve been experimenting and brainstorming different ways in which audio can be tied in with gameplay, or even drive gameplay to some extent. This is quite challenging because audio/music is so abstract, but rhythm is one element that has been successfully incorporated into gameplay for some time.  To experiment with this in Unity, I wrote a set of scripts that handle beat synchronization to an audio clip.  The github project can be found here.

The way I set this up to work is by comparing the current sample of the audio data to the sample of the next expected beat to occur.  Another approach would be to compare the time values, but this is less accurate and less flexible.  Sample accuracy ensures that the game logic follows the actual audio data, and avoids the issues of framerate drops that can affect the time values.

The following script handles the synchronization of all the beat counters to the start of audio playback:

public float bpm = 120f; // Tempo in beats per minute of the audio clip.
public float startDelay = 1f; // Number of seconds to delay the start of audio playback.
public delegate void AudioStartAction(double syncTime);
public static event AudioStartAction OnAudioStart;

void Start ()
{
    StartCoroutine(StartAudio());
}

IEnumerator StartAudio ()
{
    yield return new WaitForSeconds(startDelay);

    audio.Play();

    if (OnAudioStart != null) {
        OnAudioStart();
    }
}

To accomplish this, each beat counter instance adds itself to the event OnAudioStart, seen here in the “BeatCounter” script:

void OnEnable ()
{
    BeatSynchronizer.OnAudioStart += () => { StartCoroutine(BeatCheck()); };
}

When OnAudioStart is called above, all beat counters that have subscribed to this event are invoked, and in this case, starts the coroutine BeatCheck that contains most of the logic and processing of determining when beats occur. (The () => {} statement is C#’s lambda syntax).

The BeatCheck coroutine runs at a specific frequency given by loopTime, instead of running each frame in the game loop. For example, if a high degree of accuracy isn’t required, this can save on the CPU load by setting the coroutine to run every 40 or 50 milliseconds instead of the 10 – 15 milliseconds that it may take for each frame to execute in the game loop.  However, since the coroutine yields to WaitForSeconds (see below), setting the loop time to 0 will effectively cause the coroutine to run as frequently as the game loop since execution of the coroutine in this case happens right after Unity’s Update method.

IEnumerator BeatCheck ()
{
    while (audioSource.isPlaying) {
        currentSample = audioSource.timeSamples;

        // Reset next beat sample when audio clip wraps.
        if (currentSample < previousSample) {
            nextBeatSample = 0f;
        }

        if (currentSample >= (nextBeatSample + sampleOffset)) {
            foreach (GameObject obj in observers) {
                obj.GetComponent<BeatObserver>().BeatNotify(beatType);
            }
            nextBeatSample += samplePeriod;
        }
        
        previousSample = currentSample;

        yield return new WaitForSeconds(loopTime / 1000f);
    }
}

Furthermore, the fields that count the sample positions and next sample positions are declared as floats, which may seem wrong at first since there is no possibility of fractional samples.  However, the sample period (the number of samples between each beat in the audio) is calculated from the BPM of the audio and the note value of the beat to check, so it is likely to result in a floating point value. In other words:

samplePeriod = (60 / (bpm * beatValue)) * sampleRate

where beatValue is a constant that defines the ratio of the beat to a quarter note.  For instance, for an eighth beat, beatValue = 2 since there are two eighths in a quarter.  For a dotted quarter beat, beatValue = 1 / 1.5; the ratio of one quarter to a dotted quarter.

If samplePeriod is truncated to an int, drift would occur due to loss of precision when comparing the sample values, especially for longer clips of music.

When it is determined that a beat has occurred in the audio, the script notifies its observers along with the type of beat that triggered the event (the beat type is a user-defined value that allows different action to be taken depending on the beat type).  The observers (any Unity object) are easily added through the scripts inspector panel:

The beat counter's inspector panel.

The beat counter’s inspector panel.

Each object observing a beat counter also contains a beat observer script that serves two functions: it allows control over the tolerance/sensitivity of the beat event, and sets the corresponding bit in a bit mask for what beat just occurred that the user can poll for in the object’s script and take appropriate action.

public void BeatNotify (BeatType beatType)
{
    beatMask |= beatType;
    StartCoroutine(WaitOnBeat(beatType));
}

IEnumerator WaitOnBeat (BeatType beatType)
{
    yield return new WaitForSeconds(beatWindow / 1000f);
    beatMask ^= beatType;
}

To illustrate how a game object might respond to and take action when a beat occurs, the following script activates an animation trigger on the down-beat and rotates the object during an up-beat by 45 degrees:

void Update ()
{
    if ((beatObserver.beatMask & BeatType.DownBeat) == BeatType.DownBeat) {
        anim.SetTrigger("DownBeatTrigger");
    }
    if ((beatObserver.beatMask & BeatType.UpBeat) == BeatType.UpBeat) {
        transform.Rotate(Vector3.forward, 45f);
    }
}

Finally, here is a short video demonstrating the example scene set up in the project:

Beat Synchronization in Unity Demo from Christian on Vimeo.

A Game of Tic-Tac-Toe Using the FMOD Sound Engine

With this post I’m taking a slight diversion away from low-level DSP and plug-ins to share a fun little experimental project I just completed.  It’s a game of Tic-Tac-Toe using the FMOD sound engine with audio based on the minimalist piano piece “Für Alina” by Arvo Pärt.  In the video game industry there are two predominant middleware audio tools that sound designers and composers use to define the behavior of audio within a game.  Audiokinetic’s Wwise is one, and Firelight Technologies’ FMOD is the other.  Both have their strengths and weaknesses, but I chose to work with FMOD on this little project because Wwise’s Mac authoring tool is still in the alpha stage.  I used FMOD’s newest version, FMOD Studio.

The fun and interesting part of this little project was working with the fairly unusual approach to the audio.  I explored many different ways to implement the sound in a way that both reflected the subtletly of the original music while reacting to player actions and the state of the game.  Here is a video demonstrating the result.  Listen for subtle changes in the audio as the game progresses.  The behavior of the audio is all based on a few simple rules and patterns governed by player action.

A Game of Tic-Tac-Toe with Arvo Part from Christian on Vimeo.

The game is available for download (Mac OS X 10.7+ only).