I finally set aside some time to update my iOS app, Wave, and in doing so decided to start converting some of the underlying codebase of the app from Objective-C to Swift. The code that handles converting a recorded session to a QuickTime movie was a good candidate to start with since it is very isolated from the rest of the app. On a more educational note, it provides good insight into how to use CGContext effectively to achieve good architecture, reduce complexity, and eliminate duplicated code.
When viewing a session in Wave, it is rendered into the CGContext of the view. To render it into a QuickTime movie, it is rendered into a bitmap graphics context (which is just a special type of CGContext) that represents 1 frame in the movie. That way, all the rendering can live in one place, and I just pass it a different CGContext depending on what the render target is. With that in mind, let’s see how to create the QuickTime movie.
The public API of the VideoExporter struct is shown above; it can be called to export a session to a QuickTime movie like this:
let session = ...
let exporter = VideoExporter(session: session)

DispatchQueue.global(qos: .default).async {
    let videoSize = CGSize(width: 640, height: 480)
    exporter.export(size: videoSize) { (framesCompleted, totalFrames) in
        // Report progress
        debugPrint("\(framesCompleted)/\(totalFrames)")
    } completion: { (fileUrl, error) in
        if let movieUrl = fileUrl {
            debugPrint("Export done: \(movieUrl.absoluteString)")
        } else {
            debugPrint("Export error: ", error?.localizedDescription ?? "unknown error")
        }
    }
}
The export method starts out by creating a temporary file to write the QuickTime file to:
var fileUrl = URL(fileURLWithPath: NSTemporaryDirectory())
fileUrl.appendPathComponent(UUID().uuidString)
fileUrl.appendPathExtension("mov")
To write to a QuickTime format, we need an AVAssetWriter instance. It simply takes the URL of the file we wish to write to and the format of that file. However, it also needs an input source, which is what we use to write the content into the file. In this case, we need an instance of AVAssetWriterInput. As mentioned at the start, we want to be able to render to a bitmap context and use that to append the pixel buffer as frames of the QuickTime movie, so an instance of AVAssetWriterInputPixelBufferAdaptor is needed.
let options: [String: Any] = [kCVPixelBufferCGImageCompatibilityKey as String: kCFBooleanTrue as Any]
var pixelBuffer: CVPixelBuffer?
let status = CVPixelBufferCreate(kCFAllocatorDefault, Int(size.width), Int(size.height), kVideoPixelFormatType, options as CFDictionary, &pixelBuffer)
if status != kCVReturnSuccess {
    // Handle error
    return
}

let videoSettings: [String: Any] = [AVVideoCodecKey: AVVideoCodecType.hevc,
                                    AVVideoWidthKey: size.width,
                                    AVVideoHeightKey: size.height
]

let pixelBufferAttr: [String: Any] = [kCVPixelBufferPixelFormatTypeKey as String: kVideoPixelFormatType]
let writerInput = AVAssetWriterInput(mediaType: .video, outputSettings: videoSettings, sourceFormatHint: nil)
let adaptor = AVAssetWriterInputPixelBufferAdaptor(assetWriterInput: writerInput, sourcePixelBufferAttributes: pixelBufferAttr)

let assetWriter = try! AVAssetWriter(url: fileUrl, fileType: .mov)
assetWriter.add(writerInput)
assetWriter.startWriting()
assetWriter.startSession(atSourceTime: .zero)
We’re now ready to render the frames and append them to the asset writer. The bitmap context is created by initializing it with the memory of the CVPixelBuffer so that when we render to the bitmap context, it will write the pixel information to this buffer, which is then appended to the asset writer.
var status = CVPixelBufferLockBaseAddress(pixelBuffer, CVPixelBufferLockFlags(rawValue: 0))
if status != kCVReturnSuccess {
    // Handle error
}

let pixelData = CVPixelBufferGetBaseAddress(pixelBuffer)
let colorSpace = CGColorSpaceCreateDeviceRGB()
let bytesPerRow = CVPixelBufferGetBytesPerRow(pixelBuffer)
let bitmapInfo = CGImageAlphaInfo.premultipliedFirst.rawValue
let bitmapContext = CGContext(data: pixelData, width: Int(size.width), height: Int(size.height), bitsPerComponent: 8, bytesPerRow: bytesPerRow, space: colorSpace, bitmapInfo: bitmapInfo)!

let width = CGFloat(bitmapContext.width)
let height = CGFloat(bitmapContext.height)

// Flip the coordinate system for iOS
bitmapContext.translateBy(x: 0.0, y: height)
bitmapContext.scaleBy(x: 1.0, y: -1.0)

// Each 'pos' in the renderer corresponds to 1 frame
while (renderer.pos < renderer.length) {
    bitmapContext.addRect(CGRect(x: 0.0, y: 0.0, width: width, height: height))
    bitmapContext.setFillColor(gray: 0.3, alpha: 1.0)
    bitmapContext.drawPath(using: .fill)

    renderer.drawInContext(bitmapContext)

    var appendOk = false
    var idx = 0
    while !appendOk && (idx < 1000) {
        if adaptor.assetWriterInput.isReadyForMoreMediaData {
            let frameTime = CMTime(value: CMTimeValue(renderer.pos), timescale: CMTimeScale(kVideoFPS))
            appendOk = adaptor.append(pixelBuffer, withPresentationTime: frameTime)
        } else {
            Thread.sleep(forTimeInterval: 0.01)
        }

        idx += 1
    }

    if !appendOk {
        debugPrint("Missed rendering frame.")
        // Handle error
    }

    renderer.pos += 1
    DispatchQueue.main.async {
        progressBlock?(self.renderer.pos, self.renderer.length)
    }
}

adaptor.assetWriterInput.markAsFinished()
status = CVPixelBufferUnlockBaseAddress(pixelBuffer, CVPixelBufferLockFlags(rawValue: 0))
if status != kCVReturnSuccess {
    // Handle error
}
When appending the pixel buffer to the asset writer input adaptor, the presentation time of that frame needs to be provided as well. In this case, that will be the frame number as the value and the FPS (60 frames per second) for the timescale. In other words, this lets us specify the presentation time of a particular frame within the timeline of the video (frame number 30, for example, will be 0.5 seconds into the video). Furthermore, the asset writer may not be ready for more media data as soon as we ask for it, so we check the isReadyForMoreMediaData property within a loop (up to some limit of time) before appending the pixel buffer with the adaptor.
The exporting is now finished, and the QuickTime video is ready! The final step is to let the asset writer know that we’re done, and call the completion block:
assetWriter.finishWriting {
    switch assetWriter.status {
    case .completed:
        DispatchQueue.main.async {
            completion?(assetWriter.outputURL, nil)
        }
    case .failed:
        // Handle error
    default:
        // Handle other cases
    }
}
Having previously covered the general architecture and the graphics system, we come now to the audio part of the game engine. One might be surprised (or unsurprised depending on one’s expectations) that it is conceptually very similar to how the graphics work. As a quick recap of what was covered in the last part, the platform sends some memory to the game representing a bitmap that the game draws into for each frame, then takes that bitmap at the end of the frame and renders it onto the screen.
For my audio system, it works very much the same. The platform sends some memory representing an audio buffer to the game layer. Like the graphics system, the game layer does all the heavy lifting, handling the mixing of audio sources from music and sound effects into the buffer passed in by the platform layer. The platform layer then takes this audio buffer and sends it to the audio output provided by the operating system.
To do this, the platform layer needs to talk to Core Audio, which powers the audio for all of Apple’s platforms. Core Audio is a purely C-based API, and can be a little cumbersome to deal with at times (albeit very powerful). However, since the game layer handles all the mixing and all the platform layer is concerned with is one master audio buffer, calls to the Core Audio API are minimal.
In order to encapsulate data around the audio buffer, the bridging layer declares a PlatformAudio struct (recall that the bridging layer is a .h/.cpp file pair that connects the game, written in C++, to the iOS platform layer written in Swift):
The AudioComponentInstance object represents an Audio Unit, which in Core Audio is required for working with audio at a low level, and provides the lowest latency for audio processing. After initializing the platform layer (seen back in the first part of this series), the audio system is first initialized on the OS side before initializing it in the game layer (via the bridging interface). Once that is done, the output unit is started — it will become clearer what this actually does very soon.
The audio interface in the bridging layer consists of three functions:
Pretty straightforward, really. The ios_create_platform_audio function is called at the start of initAudio:
private func initAudio(sampleRate: Double, channels: UInt16) -> Bool {
    let bytesPerSample = MemoryLayout<AudioSample>.size
    if let ptr = ios_create_platform_audio(sampleRate, channels, UInt16(bytesPerSample)) {
        platformAudio = ptr.pointee
    } else {
        return false
    }

    var streamDescription = AudioStreamBasicDescription(mSampleRate: sampleRate,
                                                        mFormatID: kAudioFormatLinearPCM,
                                                        mFormatFlags: kLinearPCMFormatFlagIsSignedInteger | kLinearPCMFormatFlagIsPacked,
                                                        mBytesPerPacket: platformAudio.bytesPerFrame,
                                                        mFramesPerPacket: 1,
                                                        mBytesPerFrame: platformAudio.bytesPerFrame,
                                                        mChannelsPerFrame: platformAudio.channels,
                                                        mBitsPerChannel: UInt32(bytesPerSample * 8),
                                                        mReserved: 0)

    var desc = AudioComponentDescription()
    desc.componentType = kAudioUnitType_Output
    desc.componentSubType = kAudioUnitSubType_RemoteIO
    desc.componentManufacturer = kAudioUnitManufacturer_Apple
    desc.componentFlags = 0
    desc.componentFlagsMask = 0

    guard let defaultOutputComponent = AudioComponentFindNext(nil, &desc) else {
        return false
    }

    var status = AudioComponentInstanceNew(defaultOutputComponent, &audioOutput)
    if let audioOutput = audioOutput, status == noErr {
        var input = AURenderCallbackStruct()
        input.inputProc = ios_render_audio
        withUnsafeMutableBytes(of: &platformAudio) { ptr in
            input.inputProcRefCon = ptr.baseAddress
        }

        var dataSize = UInt32(MemoryLayout<AURenderCallbackStruct>.size)
        status = AudioUnitSetProperty(audioOutput, kAudioUnitProperty_SetRenderCallback, kAudioUnitScope_Input, 0, &input, dataSize)
        if status == noErr {
            dataSize = UInt32(MemoryLayout<AudioStreamBasicDescription>.size)
            status = AudioUnitSetProperty(audioOutput, kAudioUnitProperty_StreamFormat, kAudioUnitScope_Input, 0, &streamDescription, dataSize)
            if status == noErr {
                status = AudioUnitInitialize(audioOutput)
                return status == noErr
            }
        }
    }

    return false
}
After creating the PlatformAudio instance, the method proceeds to setup the output Audio Unit on the Core Audio side. Core Audio needs to know what kind of audio it will be dealing with and how the data is laid out in memory in order to interpret it correctly, and this requires an AudioStreamBasicDescription instance that is eventually set as a property on the audio output unit.
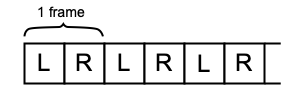
The first property is easy enough, just being the sample rate of the audio. For the mFormatID parameter, I pass in a flag specifying that the audio data will be uncompressed — just standard linear PCM. Next, I pass in some flags for the mFormatFlags parameter specifying that the audio samples will be packed signed 16 bit integers. Another flag that can be set here is one that specifies that the audio will be non-interleaved, meaning that all samples for each channel are grouped together, and each channel is laid out end-to-end. As I have omitted this flag, the audio is interleaved, meaning that the samples for each channel are interleaved in a single buffer as in the diagram below:
Interleaved audio layout.
(As a quick side-note, although the final format of the audio is signed 16 bit integers, the game layer mixes in floating point. This is a common workflow in audio, to mix and process at a higher resolution and sampling rates than the final output.)
The rest of the fields in the stream description require a bit of calculation. Well, except for mFramesPerPacket, which is set to 1 for uncompressed audio; and since there is 1 frame per packet, mBytesPerPacket is the same as the number of bytes per frame. mChannelsPerFrame is just going to be the number of channels, and mBitsPerChannel is just going to be the size of an audio sample expressed as bits. The bytes per frame value, as seen above, is simply calculated from the bit depth of the audio (bytes per sample) and the number of channels.
Next, I need to get the output Audio Component. I need an Audio Unit in the Core Audio system that will send audio to the output hardware of the device. To find this component, an AudioComponentDescription is required and needs to be configured with parameters that return the desired unit (iOS contains a number of built-in units, from various I/O units to mixer and effect units). To find the audio output unit I need, I specify “output” for the type, “remote I/O” for sub type (the RemoteIO unit is the only one that connects to the audio hardware for I/O), and “Apple” as the manufacturer.
Once the component is found with a call to AudioComponentFindNext, I initialize the audio output unit with this component. This Audio Unit (and Core Audio in general) works on a “pull model” — you register a function with Core Audio who will then call you whenever it needs audio from you to fill its internal buffers. This function gets called on a high-priority thread, and runs at a faster rate than the game’s update function. Effectively this means you have less time to do audio processing per call than you do for simulating and rendering a frame, so the audio processing needs to be fast enough to keep up. Missing an audio update means the buffer that is eventually sent to the hardware is most likely empty, resulting in audio artifacts like clicks or pops because of the discontinuity between the audio in the previous buffer.
In order to set the callback function on the Audio Unit, I need an AURenderCallbackStruct instance that takes a pointer to the callback function and a context pointer. Once I have this, it is set as a property on the Audio Unit by calling AudioUnitSetProperty, and specifying “input” as the scope (this tells Core Audio that this property is for audio coming in to the unit). Next I take the stream description that was initialized earlier and set it as a property on the Audio Unit, also on the “input” scope (i.e. this tells the Audio Unit about the audio data coming in to it). Finally, the audio is initialized and is then ready for processing. The call we saw earlier to start the Audio Unit after initialization tells the OS to start calling this callback function to receive audio.
The callback function itself is actually quite simple:
Similar to the graphics system, here is where the call is made to the bridging layer to process (i.e. fill) the audio buffer with data from the game. Core Audio calls this function with the number of frames it needs as well as the buffer(s) to place the data in. Once the game layer is done processing the audio, the data is copied into the buffer provided by the OS. The ios_process_audio function simply forwards the call to the game layer after specifying how many frames of audio the system requires:
The last part to cover in the audio system of my custom game engine is how to handle audio with regard to the lifecycle of the application. We saw how audio is initialized in the didFinishLaunching method of the AppDelegate, so naturally the audio is shut down in the applicationWillTerminate method:
func applicationWillTerminate(_ application: UIApplication) {
    if let audioOutput = audioOutput {
        AudioOutputUnitStop(audioOutput)
        AudioUnitUninitialize(audioOutput)
        AudioComponentInstanceDispose(audioOutput)
    }

    ios_game_shutdown()

    ios_audio_deinitialize(&platformAudio)
    ios_platform_shutdown()
}
When the user hits the Home button and sends the game into the background, audio processing needs to stop, and when the game is brought back to the foreground again, it needs to resume playing. Stopping the Audio Unit will halt the callback function that processes audio from the game, and starting it will cause Core Audio to resume calling the function as needed.
func applicationWillEnterForeground(_ application: UIApplication) {
    if let audioOutput = audioOutput {
        AudioOutputUnitStart(audioOutput)
    }

    if let vc = window?.rootViewController as? ViewController {
        vc.startGame()
    }
}

func applicationDidEnterBackground(_ application: UIApplication) {
    if let audioOutput = audioOutput {
        AudioOutputUnitStop(audioOutput)
    }

    if let vc = window?.rootViewController as? ViewController {
        vc.stopGame()
    }
}
This completes my detailed overview of the three critical pieces of any game engine: the platform, the graphics, and the audio. And as I did with the blog post on the graphics system, here is a short demo of the audio system running in the game engine:
In the last part, I gave a brief glimpse into the graphics part of implementing a custom game engine on iOS — setting a Metal-backed view as the main view of the game’s View Controller. This view is what will contain the entire visual representation of the game. In this part, I will detail how I go about setting up the Metal view and how the game itself renders a frame into it. And just to reiterate what I said in the last part, this is just one way of doing this; this works for me and the game I am making. If nothing else, let it serve as a guide, reference, and/or inspiration.
First of all, I make use of a software renderer that I wrote for my game. This is quite unusual these days with all the high-powered and specialized GPUs in nearly every device out there, but you might be surprised at what a properly optimized software renderer is capable of; not to mention some nice benefits as well, such as avoiding the complexities of GPU APIs and porting issues (Metal vs. DirectX vs. OpenGL, etc.). I also really enjoyed the knowledge and insight I gained through the process of writing my own renderer. So that being said, why the need for the Metal view, or the use of Metal at all on iOS?
The general overview of the way it works is that each frame of the game is simulated and then rendered into a bitmap by the game layer. This bitmap (or more specifically the memory for this bitmap) is provided to the game by the platform layer. Once the game is done simulating a frame and rendering the result into this bitmap, the platform layer takes this bitmap and displays it on the screen using Metal.
To represent this bitmap, I have a struct called PlatformTexture defined in the bridging header file we saw in the last part:
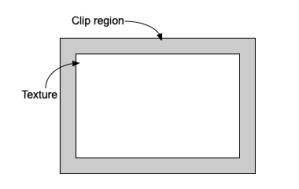
The instance itself of PlatformTexture is owned by the bridging .cpp file, so it returns a pointer to the caller (in this case the platform layer). Initialization allocates memory for the texture, including extra for a clip region, or pixel “apron”, around the texture to guard against writing past the bounds of the texture. (It’s also useful for effects like screen shake.) Essentially it can be visualized like this:
Visualization of the PlatformTexture memory.
Furthermore, the pixel format of the texture is the standard RGBA format with each pixel represented as a packed 32-bit integer (8 bits per component).
Initialization of the PlatformTexture is handled within the ViewController class:
To simulate a frame of the game, the update_and_render function from the game layer needs to be called every 1/60th of a second (to achieve 60 fps), and as I mentioned earlier, the platform layer needs to pass the game layer some memory for the bitmap that will be rendered into. This memory is, of course, the texture pointer in the PlatformTexture type. Here is the function as included in the .h/.cpp bridging files:
The call to the ios_update_and_render function converts the PlatformTexture into the struct the game actually expects, and then makes a call to the game layer to update and render the frame. (Again, this conversion is needed because bbTextureBuffer is declared in a C++ interface file which cannot interoperate with Swift, so the plain C PlatformTexture data type acts as a bridge between the Swift side and the C++ side.)
The ios_update_and_render function is called from the getFrame method of the View Controller (which was shown in the last part on setting up the platform layer):
@objc private func getFrame(_ sender: CADisplayLink) {
    ios_begin_frame()

    let dt = Float(sender.targetTimestamp - sender.timestamp)
    ios_update_and_render(&platformTexture, dt)

    if let metalView = view as? MetalView {
        metalView.renderFrame(platformTexture: platformTexture)
    }

    ios_end_frame()
}
Here we see how Metal comes into the picture (no pun intended). After the game is done simulating and rendering the frame into the PlatformTexture object, the Metal view takes over and draws the image to the screen.
We saw in the previous part on setting up the platform layer where the MetalView got initialized, but now let’s look at what that contains. UIViews in iOS are all what Apple calls “layer-backed”, containing the backing Core Animation layer that defines the actual visual contents of the view (unlike NSView on macOS which need to be assigned a layer if it is to draw or display something). To make a UIView subclass a Metal-backed view, we need to tell it to use the CAMetalLayer class for it’s Core Animation layer by overwriting the class property layerClass:
class MetalView: UIView {
    var commandQueue: MTLCommandQueue?
    var renderPipeline: MTLRenderPipelineState?
    var renderPassDescriptor = MTLRenderPassDescriptor()
    var vertexBuffer: MTLBuffer?
    var uvBuffer: MTLBuffer?
    var texture: MTLTexture?

    let semaphore = DispatchSemaphore(value: 1)

    class override var layerClass: AnyClass {
        return CAMetalLayer.self
    }

    init?(metalDevice: MTLDevice) {
        super.init(frame: UIScreen.main.bounds)
        guard let metalLayer = layer as? CAMetalLayer else { return nil }
        metalLayer.framebufferOnly = true
        metalLayer.pixelFormat = .bgra8Unorm
        metalLayer.device = metalDevice

        // Additional initialization...
    }
}
The init method of the view configures the properties of the Metal layer. Setting the framebufferOnly property to true tells Metal that this layer will only be used as a render target, allowing for some optimizations when rendering the layer for display. Framebuffer targets must use the bgra8Unorm pixel format. This format is simply an unsigned 32-bit RGBA format, but in BGRA order.
We now get into more nitty-gritty Metal stuff. In order to do most anything in Metal, we need a command queue, which gives us a command buffer, which then allows us to encode commands for Metal to perform. In order to get a command encoder from the command buffer, we need a render pass descriptor. A render pass descriptor contains a set of attachments that represent the destination, or target, of a render pass. In other words, one of the attachments in the render pass descriptor is the color attachment, which is essentially the pixel data of a render pass. The last thing we need is a render pipeline state. This object represents a particular state during a render pass, including the vertex and fragment functions. The next part of the init method of the MetalView sets up these objects:
let library = metalDevice.makeDefaultLibrary()

let vertexShader = "basic_vertex"
let fragmentShader = "texture_fragment"
let vertexProgram = library?.makeFunction(name: vertexShader)
let fragmentProgram = library?.makeFunction(name: fragmentShader)
let renderPipelineDescriptor = MTLRenderPipelineDescriptor()
renderPipelineDescriptor.vertexFunction = vertexProgram
renderPipelineDescriptor.fragmentFunction = fragmentProgram
renderPipelineDescriptor.colorAttachments[0].pixelFormat = .bgra8Unorm

commandQueue = metalDevice.makeCommandQueue()
renderPipeline = try? metalDevice.makeRenderPipelineState(descriptor: renderPipelineDescriptor)

renderPassDescriptor.colorAttachments[0].loadAction = .dontCare
renderPassDescriptor.colorAttachments[0].storeAction = .store
First, a library gives us access to the shader functions that were compiled into the application (more on those later). Since all I need Metal to do is to draw a bitmap onto the screen, I only need two simple shader functions: a basic vertex shader, and a fragment shader for texture mapping. A render pipeline descriptor is created in order to make the render pipeline state. Above we can see that the render pipeline state is configured with the two shader functions, and the pixel format for the color attachment. The command queue is simply created from the Metal Device.
The color attachment (i.e. render target for pixel data) of the render pass descriptor is configured for its load and store actions. The load action is performed at the start of a rendering pass, and can be used to clear the attachment to a specific color. Since I will be writing the entire bitmap every frame into the color attachment, there is no need to clear it beforehand. For the store action, I specify that the results of the render pass should be saved in memory to the attachment.
The next, and final, thing that needs to be set up in the init method of the MetalView are the buffer and texture objects required for rendering. I’m not going to go into the details of texture mapping, which is what the buffer and texture objects are required for, as that is just too big of a topic, so I will assume some basic knowledge of UV texture mapping going forward.
First, I define the vertices and UV coordinates of the unit quad primitive for texture mapping (the coordinate system in Metal has +x/y going to the right and up, and -x/y going to the left and down):
As we can see, these vertices and UV coordinates define two triangles that make up the unit quad. Metal buffers then need to be created to contain this data to send to the GPU:
let vertexBufferSize = MemoryLayout<Float>.size * unitQuadVertices.count
let uvBufferSize = MemoryLayout<Float>.size * unitQuadUVCoords.count
guard let sharedVertexBuffer = metalDevice.makeBuffer(bytes: unitQuadVertices, length: vertexBufferSize, options: .storageModeShared),
    let sharedUVBuffer = metalDevice.makeBuffer(bytes: unitQuadUVCoords, length: uvBufferSize, options: .storageModeShared) else {
        return nil
}

vertexBuffer = metalDevice.makeBuffer(length: vertexBufferSize, options: .storageModePrivate)
uvBuffer = metalDevice.makeBuffer(length: uvBufferSize, options: .storageModePrivate)
guard let vertexBuffer = vertexBuffer, let uvBuffer = uvBuffer else {
    return nil
}

let textureWidth = Int(frame.width)
let textureHeight = Int(frame.height)

guard let commandBuffer = commandQueue?.makeCommandBuffer(), let commandEncoder = commandBuffer.makeBlitCommandEncoder() else {
    return nil
}

commandEncoder.copy(from: sharedVertexBuffer, sourceOffset: 0, to: vertexBuffer, destinationOffset: 0, size: vertexBufferSize)
commandEncoder.copy(from: sharedUVBuffer, sourceOffset: 0, to: uvBuffer, destinationOffset: 0, size: uvBufferSize)
commandEncoder.endEncoding()

commandBuffer.addCompletedHandler { _ in
    let textureDescriptor = MTLTextureDescriptor.texture2DDescriptor(pixelFormat: .rgba8Unorm, width: textureWidth, height: textureHeight, mipmapped: false)
    textureDescriptor.cpuCacheMode = .writeCombined
    textureDescriptor.usage = .shaderRead
    self.texture = metalDevice.makeTexture(descriptor: textureDescriptor)
}
commandBuffer.commit()
Buffers are created by the Metal Device by specifying a length in bytes, and can be initialized with existing data such as the vertex and UV data above. Since this vertex and UV data will never change, access to that memory will be faster if it is transferred to the GPU to have private access exclusive to the GPU. i.e. The CPU does not need to change or do anything with this data after it creates it, so transferring it to the GPU optimizes the render pass since this data won’t have to constantly be copied from the CPU to the GPU every frame. To copy the vertex data to the GPU, I set up a command encoder and issue commands to copy the data from one buffer to the other that was initialized with storageModePrivate access. This is done for both the vertex and UV buffers. By adding a completion handler to the command buffer, I can be notified when this process is done, and then proceed to set up the texture object that will be passed to the fragment shader.
The Metal texture is created from a texture descriptor, which has been created with the width and height and pixel format of the texture. Some additional properties are configured for optimization purposes. The writeCombined option tells Metal that this texture will only be written to by the CPU, while the shaderRead option indicates that the fragment shader will only ever read from the texture. This texture will eventually contain the rendered bitmap from the game that will be displayed on screen.
Now let’s see how this is all put together in the renderFrame method of the MetalView class:
public func renderFrame(platformTexture: PlatformTexture) {
    guard let metalLayer = layer as? CAMetalLayer, let drawable = metalLayer.nextDrawable() else {
        return
    }

    semaphore.wait()
    renderPassDescriptor.colorAttachments[0].texture = drawable.texture;

    if let tex = texture, let textureBytes = platformTexture.texture {
        let region = MTLRegionMake2D(0, 0, tex.width, tex.height)
        tex.replace(region: region, mipmapLevel: 0, withBytes: textureBytes, bytesPerRow: platformTexture.bytesPerRow)
    }

    guard let commandBuffer = commandQueue?.makeCommandBuffer(),
        let commandEncoder = commandBuffer.makeRenderCommandEncoder(descriptor: renderPassDescriptor),
        let renderPipeline = renderPipeline else {
            semaphore.signal()
            return
    }

    commandEncoder.setRenderPipelineState(renderPipeline)
    commandEncoder.setVertexBuffer(vertexBuffer, offset: 0, index: 0)
    commandEncoder.setVertexBuffer(uvBuffer, offset: 0, index: 1)
    commandEncoder.setFragmentTexture(texture, index: 0)
    commandEncoder.drawPrimitives(type: .triangle, vertexStart: 0, vertexCount: 6)
    commandEncoder.endEncoding()

    commandBuffer.addCompletedHandler { _ in
        self.semaphore.signal()
    }

    commandBuffer.present(drawable)
    commandBuffer.commit()
}
In order to draw to the Metal layer of the MetalView, we need a drawable from it. The texture of that drawable is then assigned to the color attachment of the render pass descriptor, which contains the target attachments for the render pass. This effectively says “store the result of this render pass into the drawable texture of the view’s Metal layer”. Next, I copy the texture bytes of the PlatformTexture from the game into the Metal texture object that will be passed to the fragment shader. Following that, a set of render commands are issued to the GPU: set the current pipeline state (containing the vertex and fragment functions to run), assign the vertex and UV buffers for the vertex stage, assign the texture for the fragment stage, draw the unit quad primitive as two triangles, and then finalize and commit the commands. The semaphore is used to ensure the render pass has completed before beginning a new one.
Finally, Metal shader functions go into a file with a .metal extension and are compiled as part of the build process. The shaders I use for my implementation are very straightforward:
The vertex shader simply assigns the incoming vertex and UV coordinates to the VertexOut type for each vertex in the draw call. The fragment shader does the simples texture mapping, using nearest filtering since the size of the unit quad primitive and the texture are exactly the same (i.e. the mapping from the texture to the quad primitive is 1-1).
That concludes this part, covering the graphics implementation of my custom game engine on iOS. For more information on writing a good software renderer, check out early episodes of Handmade Hero — a great series that inspired and informed me in the making of my game.
In the next part, I will be covering the other critical piece in any game: audio. For now, here is a short demo of a bunch of triangles (running at a lovely 60fps!):
Video games are what got me interested in programming. I suspect that is true for many programmers. And although I’m not programming games professionally in my career, I still find time to work on my own game as a hobby project. It’s truly rewarding and very enjoyable to have a fun side project to work on that challenges me in different ways than my job does. This particular game has been keeping me busy for the past few years (working on something so complicated part-time is quite time-consuming!), but it’s at a stage now that feels like an actual playable game. As such I’ve been thinking about platforms it would be well-suited for, and touch screens like tablets and phones are a great fit. All development up to this point has been on Mac and Windows, but I became more and more curious to get a sense of what it would feel like on a touch screen, so I finally decided to get the game running on iOS.
Now that I’ve completed the first pass of my iOS platform layer, I thought it would be interesting to detail what went in to making it work, and how a game engine might look on iOS. Of course there are many different ways this can be done; this is just how I did it, and what works for me and the game I am making. Hopefully this knowledge can be helpful and inspiring in some way.
This first part will cover setting up the larger platform layer architecture and what was needed in order to have my game talk to iOS and vice versa. Following parts will go more into detail on using Metal for graphics and Core Audio for, well.. audio. First, however, it’s important to get a view of how the game itself fits into the iOS layer.
The entire game architecture can be split into two main layers: the game layer and the platform layer. The iOS version adds a third intermediate layer as we will shortly see, but broadly speaking, this is how I see the overall structure. The vast bulk of the code exists in the game layer with a minimal amount of code existing in the platform layer that is required for the game to talk to the operating system and vice versa. This has made the initial port to iOS relatively easy and quick.
One of the first things any application needs on any OS is a window, and it’s no different for a game. On iOS we can create a window in the AppDelegate:
This should look familiar to any iOS developer. We create a window with the same bounds as the main screen, set the root ViewController, and then basically show the window. In the ViewController we need to create the view itself, which is what the game will draw into, and is ultimately what is displayed to the user. To do this, we override loadView:
class ViewController: UIViewController {
    let metalDevice = MTLCreateSystemDefaultDevice()

    override func loadView() {
        var metalView: MetalView?
        if let metalDevice = metalDevice {
            metalView = MetalView(metalDevice: metalDevice)
        }

        view = metalView ?? UIView(frame: UIScreen.main.bounds)
        view.backgroundColor = UIColor.clear
    }
}
I use Metal to display the bitmap for each frame, so for that I set up a Metal-backed view and assign it to the ViewController‘s view property (in case that fails or the device doesn’t support Metal, a normal UIView can be set instead to at least prevent the game from crashing). I’ll be going into more detail on how the Metal view works in the next part of this series.
Just as a small little detail, I don’t want the status bar shown in my game, so I override a property on the ViewController to hide it:
With those core elements set up (a window and a view that will contain the game), it’s time to look into how to integrate the game layer into the platform layer.
The first order of business is dealing with the fact that the platform layer is written in Swift while the game layer is written entirely in C++. Interoperability between Swift and C is relatively painless, but Swift cannot interoperate with C++, so this means I need a C interface as a bridge between the game and the platform. This is what I meant by the extra intermediate layer I mentioned above being required for the iOS version. I didn’t want to convert any of my existing game code into a C interface, so instead I created a .h/.cpp file pair in my iOS project where the .h file is a pure C interface and the .cpp file wraps the calls to the actual game as well as implementing some of the lower-level platform functionality like threads and file I/O.
Here is what part of the .h interface file looks like:
#ifdef __cplusplus
extern "C" {
#endif

enum TouchPhase {
    BEGIN, MOVE, END
};

#pragma mark - Platform
bool ios_platform_initialize(uint32_t threadCount);
void ios_platform_shutdown();

#pragma mark - Game
void ios_game_startup();
void ios_game_shutdown();
void ios_begin_frame();
void ios_end_frame();

#pragma mark - Input
void ios_input_reset();
void ios_input_add_touch(float x, float y, enum TouchPhase phase);

#ifdef __cplusplus
}
#endif
In addition to including some system header files and the corresponding .h file for the C interface, I also include the main header file for the game so I can call directly into the game from this .cpp file. This file also statically defines some game layer structures that the platform layer needs access to, made possible by including the game’s main header file. The ios_platform_initialize function allocates memory, initializes the worker thread pool, as well as some additional work that we will see later. The ios_game_startup and ios_game_shutdown functions just forward their calls to the actual game. In order to expose the C interface to Swift, we make use of a module map. The Clang documentation defines module maps as “the crucial link between modules and headers,” going on to say that they describe how headers map onto the logical structure of a module. C/C++ code is treated as a module by Swift, and a module map describes the mapping of the interface into that module. The file itself is actually very simple in my case:
module Game {
    header "bullet_beat_ios.h"
    export *
}
That’s it! The file is required to have a .modulemap suffix, and it is placed in the same directory as the .h interface file (the header declaration specifies the relative path to the location of the module map file). Xcode also needs to know about this file, so the directory were it is located is specified in the “Import Paths” build setting under “Swift Compiler – Search Paths”. I can now import the “Game” module into any Swift file, which allows me to call any C function exposed by the .h file in that Swift file.
For instance, the AppDelegate‘s launch method can now be expanded to include platform initialization:
import UIKit
import Game

func application(_ application: UIApplication, didFinishLaunchingWithOptions launchOptions: [UIApplication.LaunchOptionsKey: Any]?) -> Bool {
    let processInfo = ProcessInfo.processInfo
    let threadCount = max(processInfo.processorCount - 2, 2)
    if ios_platform_initialize(UInt32(threadCount)) {
        if let exeUrl = Bundle.main.executableURL {
            let appDir = exeUrl.deletingLastPathComponent()
            let fileManager = FileManager.default
            if fileManager.changeCurrentDirectoryPath(appDir.path) {
                print("[BulletBeat] Working directory: ", fileManager.currentDirectoryPath)
            }
        }
    }

    // Additional initialization

    ios_game_startup()

    let screen = UIScreen.main
    window = UIWindow(frame: screen.bounds)
    window?.rootViewController = ViewController()
    window?.makeKeyAndVisible()

    return true
}
The shutdown work goes into the applicationWillTerminate callback:
With this, the platform can talk to the game, but what about the game talking to the platform? The game needs several services from the platform layer, including getting the path to save game location, disabling/enabling the idle timer (iOS only), hiding/showing the cursor (desktops only), file I/O, etc. A good way of doing this is through function pointers that are assigned by the platform layer. As we saw in the .cpp file above, it defines a static bbPlatform struct, and it contains a bunch of function pointers that the game requires in order to talk to the platform. These are assigned during platform initialization.
For example, here are some of the services declared in the bbPlatform struct that need to be assigned functions:
Some of these are not applicable to iOS (like hide/show cursor), so they will just be assigned stubs. The open/close file functions can be declared directly in the .cpp file:
Others like those dealing with the idle timer and getting the save game directory path need to be defined in the Swift platform layer (in my case in the AppDelegate file):
They are assigned just after the call to initialize the platform by calling C functions through the bridging interface:
if ios_platform_initialize(UInt32(threadCount)) {
    // Other initialization work
    ios_platform_set_get_save_path_function(ios_get_save_path)
    ios_platform_set_disable_sleep_function(ios_disable_sleep)
    ios_platform_set_enable_sleep_function(ios_enable_sleep)
}
The actual assignment to the bbPlatform struct is handled in the .cpp file:
Before ending this part, there are two more critical pieces that the platform layer needs to do: input and the game loop. Touch gestures need to be recorded and mapped to the game’s input struct. And lastly, the platform layer needs to set up the game loop — synchronized to 60fps — that will call the game’s update function to simulate one frame of the game.
Input is (so far) very straightforward in my case; I just need a touch down and touch up event. I look for these by overriding the touches methods of the ViewController:
override func touchesBegan(_ touches: Set<UITouch>, with event: UIEvent?) {
    for touch in touches {
        let point = touch.location(in: view)
        ios_input_add_touch(Float(point.x), Float(point.y), BEGIN)
    }
}

override func touchesMoved(_ touches: Set<UITouch>, with event: UIEvent?) {
    for touch in touches {
        let point = touch.location(in: view)
        ios_input_add_touch(Float(point.x), Float(point.y), MOVE)
    }
}

override func touchesEnded(_ touches: Set<UITouch>, with event: UIEvent?) {
    for touch in touches {
        let point = touch.location(in: view)
        ios_input_add_touch(Float(point.x), Float(point.y), END)
    }
}

override func touchesCancelled(_ touches: Set<UITouch>, with event: UIEvent?) {
    ios_input_reset();
}
These methods just call a function in the bridging platform layer to add touch events as they come in. The BEGIN/MOVE/END enums here are declared in the .h file. The touches are placed into an input buffer which is reset at the end of each frame:
For now, I just grab the first touch recorded and map it to the game’s input struct. For the time, I don’t need anything more complicated, so I’m just keeping it as simple as possible for now. If, or when, I need to expand it, I can make use of the input buffer to keep touches around for some number of frames and then determine different gestures that way.
switch (touch->phase) {
    case BEGIN:
        input.leftMouseWentDown = true;
        break;

    case MOVE:
        break;

    case END:
        input.leftMouseWentUp = true;
        break;

    default:
        break;
}

input.mouse.x = touch->x;
input.mouse.y = touch->y;
And finally, the game loop. For this I use a CADisplayLink from the CoreAnimation framework that lets me specify a callback that is called at the rate of the screen’s refresh rate — 60Hz, or 60fps.
class ViewController: UIViewController {
    weak var displayLink: CADisplayLink?

    override func viewDidLoad() {
        super.viewDidLoad()

        // Other initialization work

        startGame()
    }

    func startGame() {
        ios_input_reset();

        displayLink = UIScreen.main.displayLink(withTarget: self, selector: #selector(getFrame(_:)))
        displayLink?.add(to: RunLoop.current, forMode: .default)
    }

    func stopGame() {
        displayLink?.invalidate()
    }

    @objc private func getFrame(_ sender: CADisplayLink) {
        ios_begin_frame()

        let dt = Float(sender.targetTimestamp - sender.timestamp)

        // Simulate one game frame and then render it to the view

        ios_end_frame()
    }
}
The startGame and stopGame methods of the ViewController are also called in the AppDelegate as part of the lifecycle of the app. When the user sends it to the background, stop the game, and when it’s coming back to the foreground (i.e. the game still exists in memory and is not being freshly launched), start it up again.
func applicationWillEnterForeground(_ application: UIApplication) {
    if let vc = window?.rootViewController as? ViewController {
        vc.startGame()
    }
}

func applicationDidEnterBackground(_ application: UIApplication) {
    if let vc = window?.rootViewController as? ViewController {
        vc.stopGame()
    }
}
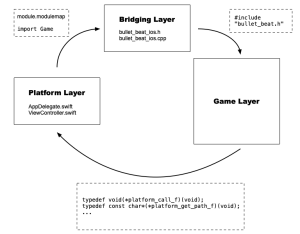
Finally, here is a visual representation of the overall structure:
Structural layers of the overall architecture of porting my custom game engine to iOS
That’s it for the overall architecture of how I ported my game to iOS. In the next part I will be discussing graphics and how the game renders each frame to the screen. Following that I will cover how the game sends audio to the platform for output through the speakers.
Over the past couple of years I have found myself writing a number of file decoders for use in my own personal codebase (PNG, TTF, BMP, WAV, OGG, and most recently FLAC). Decoding compressed file formats in particular will involve reading an arbitrary number of bits, which necessitates the need for a bit buffer. Over the course of implementing the aforementioned decoders, I tended to just write a new bit buffer implementation each time or copy a previous one over, but when it came time to write a FLAC decoder I wanted to clean these up and write one reusable bit buffer implementation.
The issue that I ended up having to deal with was how to handle little-endian vs. big-endian bit buffers. Of primary importance was the performance of the bit buffers, because reading large image or audio files leads to reading literally millions of bytes of data, so retrieving bits from the data stream has to be as fast as possible. For this reason I immediately discarded options such as inheritance & virtual functions from being considered. I figured I would probably end up writing basic functions for each byte ordering that would operate on a bit buffer parameter. e.g.:
int get_bits_le(BitBuffer *bb, int bits);
int get_bits_be(BitBuffer *bb, int bits);
However, I was curious to investigate some meta programming options. I admit, I like meta programming, but I am not really a big fan of C++ templates. I find anything but a restrained use of them leads to unnecessarily obtuse code that is hard to read, hard to follow, and a headache to debug. Not to mention having to keep in mind subtle side effects such as code bloat and portability issues. Being a fan of meta programming though, I can tolerate some amount of template usage.
My goal was to be able to declare a bit buffer with a given byte order, and then having the appropriate methods for that byte order be chosen at compile time without incurring a performance penalty. i.e.:
fsBitBuffer<fsByteOrder:littleEndian> bitBuffer;
...
int value = bitBuffer.get_bits(4);
The next step was to make sure this approach was comparatively fast with other methods. Other methods I compared against included a simple branching implementation, function overloading, and individual functions for each byte ordering. Here are brief examples of each for the sake of clarity:
To measure the performance time of each of these test cases, I ran all four through three different scenarios of reading arbitrary bits & bytes (each iteration read 1MB of data). Here are the results:
Test case A. Reading single bytes.
Test case A (without branching method)
It should come as no surprise that the branching method clearly loses out to the other three, which are quite close together.
Test case B. Reading uint16_t’s.
Here we see a similar pattern with the three non-branching implementations being very close in execution time.
Test case C. Reading an arbitrary mixture of bits (4, 1, 2, 1).
Test case C (without branching method)
While the three non-branching methods remain close in execution time in this last test case, the template specialization method edges out the other two here after the initial spike. I’ve run these test cases several other times and observed similar findings, so I’m rather pleased to see a fairly simple, straightforward use of template specialization is a worthy approach for compile-time method overloading when performance is of primary concern.
For the sake of completeness, the compiler used was Clang with Apple’s LLVM 9.0 backend (Xcode 9.4.1) with -Os optimization.
A little while ago I wrote a post about improving NSUserDefaults in Objective-C using the Objective-C runtime. This greatly simplified the string-based API of NSUserDefaults to make it much more convenient and safe to use. Having now primarily switched over to using Swift for iOS projects, I wanted to take a look at how to go about improving UserDefaults in the same way.
At first it didn’t look like it was possible to achieve the same simplified API I ended up with for NSUserDefaults because Objective-C properties and Swift properties are fundamentally different. In Objective-C, when you declare a property the compiler generates a setter and getter method along with a backing instance variable. This allows us to dynamically provide the implementation methods for the setter and getter of dynamic properties using the -(BOOL)resolveInstanceMethod: method of NSObject. (For a more detailed look at this, see the old post on NSUserDefaults.)
In Swift, properties do not have setters and getters generated for them, and the dynamic keyword is used for Key-Value Observing. That means we can’t provide method implementations at run-time that effectively set and get values from UserDefaults when a property is accessed. However, KVO can be used to achieve the same effect.
In addition to a base FSUserDefaults class that we will inherit from (similarly to how it was done in Objective-C), an observer class is needed. It’s purpose will be to observe changes to the properties of our own user defaults class that inherits from FSUserDefaults that will call the appropriate set method of UserDefaults with the new value. This will happen in the init method of the FSDefaultsObserver class. Here is the first part of that method where we retrieve the properties of our custom defaults class:
init(object: NSObject) {
    observedObject = object
    super.init()

    var propertyCount: UInt32 = 0
    if let properties = class_copyPropertyList(object_getClass(observedObject), &propertyCount) {
        for idx in 0..<propertyCount {
            let property = properties[Int(idx)]
            let name = String(cString: property_getName(property))
            let attr = String(cString: property_getAttributes(property)!)

            var keyPath = #keyPath(observedObject)
            keyPath = keyPath.appending(".").appending(name)

            let typeIdx = attr.index(attr.startIndex, offsetBy: 1)
            let type = attr[typeIdx]
            ...
The init method is initialized with the instance of our custom user defaults object, and then proceeds to get a list of properties on that class using the Objective-C runtime. We then iterate through the properties and retrieve the name and attribute string of each property to determine the key-path and the type. The key-path is used as the key for storing the value in UserDefaults. Here is an example of an attribute string for an Int property: “Tq,N,VanInteger”. The second character (in this case ‘q’) maps to a type encoding (documented here) that tells us the type of the property.
The addObserver method of NSObject takes a context parameter that will be used to store the type of the property so that the proper set method of UserDefaults can be called, so the next task is to switch on the property type and set the context parameter accordingly.
let context = UnsafeMutableRawPointer.allocate(bytes: 1, alignedTo: 1)

switch type {
case "c", "B":
    context.storeBytes(of: "b", as: Character.self)
case "s", "i", "l", "q", "S", "I", "L", "Q":
    context.storeBytes(of: "i", as: Character.self)
case "f":
    context.storeBytes(of: "f", as: Character.self)
case "d":
    context.storeBytes(of: "d", as: Character.self)
case "@":
    context.storeBytes(of: "@", as: Character.self)
default:
    assertionFailure("[FSUserDefaults] Unhandled property type.")
}
The context parameter is just a raw pointer, and for the time being I’m just storing character literals to differentiate the types (this will be improved later), with “b” for boolean, “i” for Int, “f” for float, “d” for double, and “@” for object. After this, the FSDefaultsObserver instance adds itself as an observer of the property’s key-path, along with storing the key-path and context so that it can remove itself as an observer when it is de-initialized:
Now let’s look at FSDefaultsObserver‘s implementation of the observeValue: method, which gets called whenever one of the observed properties changes value:
override func observeValue(forKeyPath keyPath: String?, of object: Any?, change: [NSKeyValueChangeKey : Any]?, context: UnsafeMutableRawPointer?) {
    if let type = context?.load(as: Character.self) {
        let value = change![.newKey]
        switch type {
        case "b": UserDefaults.standard.set(value as! Bool, forKey: keyPath!)
        case "i": UserDefaults.standard.set(value as! Int, forKey: keyPath!)
        case "f": UserDefaults.standard.set(value as! Float, forKey: keyPath!)
        case "d": UserDefaults.standard.set(value as! Double, forKey: keyPath!)
        case "u": UserDefaults.standard.set((value as! URL), forKey: keyPath!)
        case "@": UserDefaults.standard.set(value, forKey: keyPath!)
        }
    } else {
        super.observeValue(forKeyPath: keyPath, of: object, change: change, context: context)
    }
}
This takes care of when properties are changed (i.e. the setter part), but what about retrieving the defaults values? This is where things got a little dicey because we have no getter method that we can use as in the Objective-C case where a call can be made to UserDefaults to retrieve the value. However, properties themselves in Swift are the instance variables, so when we set a value on them, it will be synchronized between the value set in UserDefaults and on the property itself. What about when the app launches, though, either for the first time or after it has been terminated and our user defaults object is no longer in memory? For that, in addition to setting up the observers for each property, we can also look for the existence of a value in UserDefaults for that property’s key-path during initialization of the defaults observer object and set it on the property of our custom defaults object if one is found. Effectively this synchronizes the property values with values found in UserDefaults on initialization. Here is the additional code needed for that:
var value: Any?

switch type {
case "c", "B":
    value = UserDefaults.standard.bool(forKey: keyPath)
case "s", "i", "l", "q", "S", "I", "L", "Q":
    value = UserDefaults.standard.integer(forKey: keyPath)
case "f":
    value = UserDefaults.standard.float(forKey: keyPath)
case "d":
    value = UserDefaults.standard.double(forKey: keyPath)
case "@":
    <determine type of object, and call corresponding getter on UserDefaults>
    ...
}

if let val = value {
    observedObject.setValue(val, forKey: name)
}
UserDefaults has additional getter methods for retrieving certain types of object like Strings, Arrays, URLs, etc., so for object types we do some additional logic to determine the exact type of the object before looking for it in UserDefaults. I won’t go over that here, but it is included in the full source code at the end of the post.
The last thing to be done is to define the FSUserDefaults class that we inherit from. The only thing it will do is initialize an instance of FSDefaultsObserver.
class FSUserDefaults: NSObject {
    private var _observer: FSDefaultsObserver!

    override init() {
        super.init()
        _observer = FSDefaultsObserver(object: self)
    }
}
Now we can create our custom defaults class, and the only thing that needs to be done when adding new default values is to declare a new dynamic property on the class. That’s it. It can then be used in code like this:
class MyDefaults: FSUserDefaults {
    @objc dynamic var anInteger: Int = 0
    @objc dynamic var aString: String?

    static let shared: MyDefaults = {
        let instance = MyDefaults()
        return instance
    }()
}
Finally, here is the full source code for FSUserDefaults & FSDefaultsObserver, in which character literals are replaced with enums, as well as some other code-cleanup.
View animation on iOS is a ubiquitous part of the UI. From presenting & dismissing view controllers, to navigation; and on a smaller scale, subviews like buttons and labels, animations are everywhere and are an important element of adding polish to the feel and look of an app.
iOS already provides default animations for the aforementioned actions on view controllers and navigation controllers as well as a few others, but animating subviews or customizing view/navigation controller transitions are left up to the developer. Typically this is done using the block-based animation methods in the UIView class (-animateWithDuration:animations:, etc.). One of these variants allows you to pass in an option with four predefined animation curves or timing functions: ease in, ease out, ease in-out, and linear (the default). The timing function is what drives the pacing of the animation. Linear is fine for certain properties like alpha or color, but for movement-based animations, a curve with acceleration/deceleration feels much better. However, the predefined easing functions are very subtle, and it’s very likely there are times that you want something better.
For more control and flexibility, layer-based animations are available. On iOS, each view is layer-backed by a CALayer object that defines the view’s visual appearance and geometry. In fact, when manipulating a view’s properties such as frame, center, alpha, etc., it is actually applying those changes to its backing CALayer object.
Animating CALayers is done through one of the subclasses of CAAnimation and offers additional options for defining animations, including basic and key-frame animation. Like the block-based methods of UIView, a timing function can be specified and has the same set of predefined easing curves with an additional system default option. The timing function in this case is an instance of CAMediaTimingFunction, and it also allows you to create a custom function with a call to +functionWithControlPoints::::. However, this custom timing function is created by supplying the control points of a cubic Bezier curve, and while that does offer some additional flexibility in creating more unique animations, it can’t handle piecewise functions (e.g. for bounces), multiple curves (e.g. elastic or spring-like functions), etc. To achieve those effects, you would either have to stitch animations together, or use a combination of custom Bezier curves with key-frame animations. Both approaches end up being tedious and cumbersome to deal with.
Ideally, the block-based animation methods of UIView would allow you to pass in a custom timing function block like this:
where timingFunction is just a block that takes in a value for the current animation time, it’s duration, and returns a fractional value between 0 and 1. That’s all a timing function is! This would allow you to, for example, use any of the easing functions here. Or to supply your own homebuilt version. So in the true spirit of DIY (since Apple couldn’t be bothered to do it), let’s make that method!
To begin with, here is the actual signature of our method with an example of how it is used:
If constraint-based layout is being used, the same rules apply when using other animation methods, so once an animation has completed, constraints need to be updated to reflect the new position and/or bounds of the view.
Since the block-based animation methods are class methods, that clues us in that we need to keep some global state for in-flight animations. For now, I’m not going to worry about supporting multiple concurrent or nested animations, so I’ll keep it simple and make the state static.
Now we create a category on UIView for our block-based animation method:
@interface UIView (FSAnimations)
@property (nonatomic) CGPoint fs_center;
@property (nonatomic) CGRect fs_bounds;
@property (nonatomic) CGFloat fs_alpha;
// Additional animatable properties to support...

+ (void)fs_animateWithDuration:(NSTimeInterval)duration timingFunction:(FSAnimationTimingBlock)timingFunc animations:(void(^)(void))animations completion:(FSCompletionBlock)completion;

@end

@implementation UIView (FSAnimations)

+ (void)fs_animateWithDuration:(NSTimeInterval)duration timingFunction:(FSAnimationTimingBlock)timingFunc animations:(void (^)(void))animations completion:(FSCompletionBlock)completion {
    // Set up global state for this animation.
    fsAnimationTimingFunc = [timingFunc copy];
    fsAnimationCompletionFunc = [completion copy];
    fsAnimationDuration = duration;
    fsAnimationInFlight = YES;
    fsAnimationTimers = [NSMutableArray array];

    // Run the animation block which queues up the animations for each property of the views contained in the block.
    animations();

    // Run the animations.
    FSLaunchQueuedAnimations();
}

@end
The reason we define custom animatable properties like fs_center, fs_alpha, etc. instead of setting them directly (i.e. aView.center = newCenter;) will become clearer as we move forward. In the method above, the global state of the animation is set up and then we execute the block that defines which properties on which views will be animated. Recall that we had a line that looks like this in the example above:
aView.fs_center = newCenter;
This code is executed by the animations block in the method above, and here is what that code does:
- (void)setFs_center:(CGPoint)newCenter {
    NSAssert(fsAnimationInFlight, @"Property %@ can only be called inside a 'fs_animateWithDuration:...' block.", NSStringFromSelector(_cmd));

    CGPoint baseValue = self.center;
    CGPoint targetValue = newCenter;

    __block NSTimeInterval currentTime = 0.0;
    NSTimer *timer = [NSTimer timerWithTimeInterval:fsAnimationFrameTime repeats:YES block:^(NSTimer * _Nonnull timer) {
        currentTime += timer.timeInterval;
        NSTimeInterval t = fsAnimationTimingFunc(currentTime, fsAnimationDuration);
        CGPoint val = CGPointMake(lerp(baseValue.x, t, targetValue.x), lerp(baseValue.y, t, targetValue.y));
        self.center = val;

        FSCheckTimerAndCompleteIfLast(timer, currentTime);
    }];

    [fsAnimationTimers addObject:timer];
}
(We can now see the reason for using custom properties like fs_center instead of the view’s center property. While it is possible to override existing properties in a category, we need to set the new value of the property inside it, which in this case would cause infinite recursion.)
When an animatable fs_ property is called inside an animation block, it sets up the local state for that property, including its timer that is queued up to run after doing this for all properties in the block. Inside the timer’s block, we can see that the timing function we supply is used to calculate a value, t, used to blend between the initial state and the target state of the property (lerp here is just a normal linear interpolation function). The intermediate value of the property is set, and the block then checks to see if this timer has reached the end of the animation’s duration. If it has, and it’s the last timer to do so, it will run the animation’s completion block we provided and then reset it’s global state.
The function to start the animations simply runs through all the queued-up timers in the array and schedules them on the current run loop (which must be on the main thread since all drawing in Core Graphics must be done on the main thread). This is done to keep the animations as closely synced as possible as opposed to starting each timer in their respective property’s setter (which could cause problems with short durations and/or a long list of views and properties being animated).
The only thing remaining is an example of an easing function that can be used as a custom timing function for this method. This is one of Robert Penner’s Easing Functions (the link referenced above is a handy visual aid for them all).
NSTimeInterval(^FSEaseOutBack)(CGFloat, CGFloat) = ^NSTimeInterval(CGFloat t, CGFloat d) {
    CGFloat s = 1.70158;
    t = t/d - 1.0;
    return (t * t * ((s + 1.0) * t + s) + 1.0);
};
With that, we have a concise and convenient way of animating using a much wider variety of easing functions. This method can quite easily be used to customize existing transition animations on view/navigation controllers using their UIViewControllerTransitioningDelegate property.
Finally, here is a short demo of several animations using the method we just created. The timing functions used in this demo include EaseOutBack, EaseOutElastic, EaseOutBounce, and EaseInBack.
The NSUserDefaults class is commonly used in iOS/macOS apps to store user settings or configuration options, and can also be a convenient way of caching a small number of values or objects while an app is active. It’s interface, while not terrible, is a little clunky and relies on strings to identify the value you wish to store in the defaults database. Typical usage looks like this:
Other than being a little wordy, the main issue here is dealing with the strings used to identify the defaults property you are interested in. Either your app’s codebase will be littered with magic string constants, or you have an ever evolving global strings table (or file, or something else to manage your app’s global string constants). What we would like is something a bit cleaner, like this:
MyUserDefaults *defaults = [MyUserDefaults sharedDefaults];
//...
if (!defaults.hasAppRun) {
    // App's first launch
    //...
    defaults.hasAppRun = YES;
}
In its simplest case, MyUserDefaults would just be a wrapper around NSUserDefaults, but as we see below, this only adds to the amount of boilerplate we have to manage for each new default property that is added.
What we can do instead is take advantage of the dynamic nature of Objective-C to automatically handle any properties that are added (or removed) from MyUserDefaults. Once this has been set up in a base class (we’ll call it FSUserDefaults), MyUserDefaults only needs to inherit from this class and then declare its properties like this:
Just add the property to the interface and declare it as @dynamic in the implementation. That’s it! So how is this going to work?
First of all, methods in Objective-C are really just C functions with two hidden parameters: self and _cmd, where self is the object on which the method was invoked, and _cmd is the selector. A selector in Objective-C is just a way to identify a method, but we can get some very useful information about a property just from its selector. Before we get to that, however, we need to have a look at what @dynamic is.
Declaring a property as @dynamic tells the Objective-C compiler that its implementation methods (the setter & getter) will be resolved at runtime. Normally the compiler generates these for you, as well as synthesizing the instance variable that backs the property. e.g.
@implementation MyUserDefaults

// Unless you override either the setter or getter, these are normally auto-generated by the compiler.
- (void)setUserName:(NSString *)userName {
    _userName = userName;
}

- (NSString *)userName {
    return _userName;
}

@end
However, with the @dynamic directive, no implementation methods for the property exist at first, which would typically cause an exception to be raised if the property is accessed in any way. Before this happens though, the Objective-C runtime gives you an opportunity to either handle the missing implementation or forward the message invocation to another object. To handle it on the receiving object, we overwrite +(BOOL)resolveInstanceMethod:(SEL)sel inherited from NSObject, and as stated above, we can get all the information we need from the given selector argument of this method. Furthermore, to dynamically add a method implementation to a class, we use the function class_addMethod(Class, SEL, IMP, const char*). We already have the first two arguments to the function (the class is just our FSUserDefaults base class). IMP is a function pointer to the method implementation we are providing, and the character string is the type encoding of the method (its return type and arguments). This is the information we need going forward.
Let’s use the userName property as an example. When we access this property by trying to set a value on it for the first time, +resolveInstanceMethod: will be called and the selector argument will be -setUserName:. We can get the name of the selector as a string from the Objective-C runtime function sel_getName(SEL), which takes a selector as its argument. In this case, it will be “setUserName:”, and we can get the property name by stripping off “set” from the beginning and making the ‘U’ lowercase (if instead the selector is a getter, its string is already equal to the property name). The property name string can then be used to retrieve the actual property from the class using the function class_getProperty(Class, const char*).
Here is what we have so far:
+ (BOOL)resolveInstanceMethod:(SEL)sel {
    const char *selectorName = sel_getName(sel);
    const char *propertyName = selectorName;
    BOOL isSetter = NO;

    if ((strlen(selectorName) > 3) && (strncmp("set", selectorName, 3) == 0)) {
        propertyName = ...; // Strip off "set" and make first character lowercase.
        isSetter = YES;
    }

    objc_property_t property = class_getProperty(self, propertyName);
    if (isSetter) {
        free((void *)propertyName);
    }

    //...
}
Given the property, we can now get its attributes as a string by calling property_getAttributes(objc_property_t). This formatted string contains all the information relating to the property, including its type, the class name (if type is an object type), and attributes such as readonly, copy, etc. The two we are interested in are the type and in one special case, the class name.
The formatted attribute string always begins with a ‘T’, followed immediately by a character code that indicates its type corresponding to what @encode returns when given a type. e.g. ‘i’ is int, ‘f’ is float, ‘I’ is unsigned int, etc. With this information we can determine which method implementation (IMP) is needed for the given selector as well as the type encoding for the class_addMethod function.
Recall that Objective-C methods are just C functions with two parameters (id for the object the method is called on , and the selector) followed by the arguments. IMP is just a function pointer to this C function (its declaration is id(*IMP)(id, SEL, ...)). So based on the type that we retrieved from the property’s attribute string, we assign our method implementation to the proper C function, which is simply included and defined in the file. As our example uses the userName property that has a type of NSString, but which ultimately is a type id for a generic object, we define this C function as follows:
static void idSetter(id self, SEL _cmd, id value) {
    const char *propertyName = ...; // Get property name from sel_getName(_cmd), stripping away "set" and making first character lowercase.
    [[NSUserDefaults standardUserDefaults] setObject:value forKey:[NSString stringWithUTF8String:propertyName]];
    free((void *)propertyName);
}
A function similar to that above is required for each type we need to handle, but fortunately NSUserDefaults has only 6 types we need to deal with: id (objects), NSURL (special case), BOOL, NSInteger, float, and double. NSUserDefaults handles NSURL objects differently than a normal id type, so this is where we need the class name from the properties attributes string. Immediately following the type encoding character (which is ‘@’ in the case of an object) is the class name. We simply check to see if this is equal to “NSURL”, and if it is, select the corresponding IMP function for NSURL instead of the generic id variant.
Above I gave the setter version of the IMP function; the getter is very much the same except it returns a value and does not pass a value as argument:
static id idGetter(id self, SEL _cmd) {
    const char *propertyName = ...; // Get property name from sel_getName(_cmd).
    id value = [[NSUserDefaults standardUserDefaults] objectForKey:[NSString stringWithUTF8String:propertyName]];
    free((void *)propertyName);
    return value;
}
In the final version of the FSUserDefaults class, I have used a lot of C macro magic to avoid having to duplicate the above setter and getter functions for each supported type, but it is given here in its simpler form for readability purposes. (The Github link to the project can be found below).
Finally, we need the type encoding string to pass to class_addMethod that indicates what the signature of the IMP function we are adding is. Since the first two arguments are always id and SEL, this string has the format “r@:a” where ‘r’ is the return type and ‘a’ is the argument type (the second and third character must always be ‘@’ and ‘:’). The type encoding string that corresponds to our example is then “v@:@”, where v indicates a void return type.
We can now complete the implementation of +resolveInstanceMethod: by calling class_addMethod and returning YES to tell the runtime system we have dynamically added the method for this selector.
+ (BOOL)resolveInstanceMethod:(SEL)sel {
    const char *selectorName = sel_getName(sel);
    const char *propertyName = selectorName;
    BOOL isSetter = NO;

    if ((strlen(selectorName) > 3) && (strncmp("set", selectorName, 3) == 0)) {
        propertyName = ...; // Strip off "set" and make first character lowercase.
        isSetter = YES;
    }

    objc_property_t property = class_getProperty(self, propertyName);
    if (isSetter) {
        free((void *)propertyName);
    }

    if (property != NULL) {
        const char *propertyAttrs = property_getAttributes(property);
        char propertyType = propertyAttrs[1];

        const char *methodTypeString;
        int index;
        if (isSetter) {
            methodTypeString = "v@:_";
            index = 3;
        } else {
            methodTypeString = "_@:";
            index = 0;
        }

        char *typeEncodingString = malloc(sizeof(char) * (strlen(methodTypeString) + 1));
        strlcpy(typeEncodingString, methodTypeString, strlen(methodTypeString) + 1);
        typeEncodingString[index] = propertyType;

        IMP methodImpl = ...; // Select and set C function corresponding to propertyType

        class_addMethod(self, sel, methodImpl, typeEncodingString);
        free(typeEncodingString);

        return YES;
    }

    return [super resolveInstanceMethod:sel];
}
This class can then be dropped into any new iOS or macOS app for a much cleaner way of using NSUserDefaults. I created this class a couple of years ago, and have used it in almost every app since.
There are many other, powerful and effective ways to use the Objective-C runtime. Reflection in general is great for metaprogramming, building tools, debugging, and generic serialization.
Wow, it’s been awhile since I last posted on here! I am still doing a little bit of audio programming, but only as part of the audio system for a game/game engine I’m building from scratch. Aside from that, I’ve been doing a lot of iOS programming as part of my day job, and that got me thinking that I should diversify my blog and talk about anything programming-related that I find interesting and/or valuable. So, on to the topic at hand.
When developing an iOS app, before too long you will run into the issue of how to deliver messages or events to other parts of your app. These may include any touch events, actions, completions (e.g. as a result of async operations), or other messages, and there are several ways in which to handle these, each with their own pros/cons depending on context. Perhaps the most well-known is the delegate, which is used extensively throughout UIKit for everything from UITableViews and UICollectionViews to UITextFields and UIPickerViews. Blocks are another option that can replace delegates in some cases, and typically allow you to initialize and define behaviour all in one place without the disjointness of delegates.
For example, let’s say we have a custom lightweight table view. Blocks allow us to do this:
Yet another tool at our disposal are notifications, which are handled by NSNotificationCenter on iOS (and macOS). This is a broadcast system that delivers messages to any part of your app that may be listening. However, notifications do require some resource management as observers need to be removed once they are no longer interested in being notified (or during shutdown/deactivation). This makes them a little heavy-handed for simple message passing.
I’ll also briefly mention two final options for the sake of completion (though there may be others that I’m forgetting at the moment). The target-selector action used by UIControls adds the target-selector pair to a list that the control invokes when a certain event occurs. And finally NSInvocations encapsulate the message-sending mechanism of Objective-C/Swift into an object that can be passed around and invoked by different parts of your app.
So, why UIResponder, and how does it fit into this? The UIResponder class forms the foundation of handling events in UIKit, and implements methods that respond to touch events, motion events, etc. Most importantly for our case though, is its nextResponder property. UIKit manages what is called the responder chain for all objects that inherit from UIResponder and that are currently visible or active in the app. This includes views, buttons, view controllers, the window, and even the application itself. A more detailed look at the responder chain and how each object establishes itsnext responder connection can be seen here, but to put it simply, responder objects “walk up” the responder chain via the nextResponder property until the event is handled or there are no responders left in the chain. This behaviour can be leveraged for sending messages between responder objects using categories on UIResponder.
As an example, let’s return to the custom table view referenced above because this is something I implemented recently in an app I am working on. Instead of using a delegate to notify an object that a row has been selected, this table view uses a category on UIResponder.
In fact, that implementation is almost identical no matter how you define your method in the category. Only the method name and (possibly) signature change, but the basic mechanism of invoking it on the next responder stays the same. In several cases I have had methods that differ only by name and have the same signature ((id)sender), so the implementation can further be simplified using C macros:
And that’s it for setup! To send this event when a row has been selected, the table view would invoke this method when it detects a touch up event inside a table row. Here is how it looks in my case:
- (void)touchesEnded:(NSSet<UITouch *> *)touches withEvent:(UIEvent *)event {
    UITouch *touch = touches.allObjects.firstObject;
    if (touch) {
        CGPoint touchPoint = [touch locationInView:self];

        ATableViewRow *selectedRow = ...
        // Determine which, if any, row has been selected.

        if (selectedRow) {
            [self fs_tableView:self selectedRow:selectedRow atIndex:index];
        }
    }

    [super touchesEnded:touches withEvent:event];
}
To be notified of this message/event, any UIResponder object implements the method and handles any logic accordingly, and invokes super if the event should continue through the responder chain. In this case, it would typically be in a view controller. e.g.:
// Implemented in the view controller containing the table view
- (void)fs_tableView:(ATableView *)tableView selectedRow:(ATableViewRow *)row atIndex:(NSUInteger)index {
    // Do something...
    // Call super if needed. i.e. if an ancestor also wants to know about this event.
    // [super fs_tableView:tableView selectedRow:row atIndex:index];
}
This strategy is also great for when table view cells need to send messages. For example, if a cell has 1 or more buttons, you can invoke the UIResponder category method in the button’s selector to pass the event up the responder chain, which will pass through the table view, it’s superview if one exists, and on to the view controller where you can handle the event.
// Defined in ATableViewRow.m
// A UIButton either has it's action set via IBAction in Interface Builder, or added with -addTarget:action:forControlEvents:
- (IBAction)buttonPressed:(id)sender {
    [self fs_editAction:sender];
}
I find this to be a nice alternative to delegates or notifications when it may be somewhat cumbersome to pass instances around and when you don’t want to have to think about subscribing & unsubscribing observers for notifications. It offers similar flexibility that delegates have in that you can define the method signatures however you want with the added benefit of being able to notify more than one responder very easily.
As a final example, I used this in a custom popover bubble view to notify other views and view controllers when the popover was dismissed by the user, following a similar pattern to the –viewWillDisappear:, –viewDidDisappear: pair of methods that exist on UIViewControllers. For the custom popover, I have two category methods on UIResponder called –fs_popoverWillDismiss: and –fs_popoverDidDismiss: that are handled in the view controller that presented the popover, updating the UI with some fade animations and re-enabling some controls. For such a simple, lightweight view this is a nice, concise way for it to pass along its events.
Over the past couple of years, I’ve built up a nice library of DSP code, including effects, oscillators, and utilities. One thing that always bothered me however, is how to test this code in an efficient and reliable way. The two main methods I have used in the past have their pros and cons, but ultimately didn’t satisfy me.
One is to process an effect or generate a source into a wave file that I can open with an audio editor so I can listen to the result and examine the output. This method is okay, but it is tedious and doesn’t allow for real-time adjustment of parameters or any sort of instant feedback.
For effects like filters, I can also generate a text file containing the frequency/phase response data that I can view in a plotting application. This is useful in some ways, but this is audio — I want to hear it!
Lately I’ve gotten to know Pure Data a little more, so I thought about using it for interactive testing of my DSP modules. On its own, Pure Data does not interact with code of course, but that’s where libpd comes in. This is a great library that wraps up much of Pure Data’s functionality so that you can use it right from your own code (it works with C, C++, Objective-C, Java, and others). Here is how I integrated it with my own code to set up a nice flexible testing framework; and this is just one application of using libpd and Pure Data together — the possiblities go far beyond this!
First we start with the Pure Data patches. The receiver patch is opened and maintained in code by libpd, and has two responsiblities: 1) generate a test tone that the effect is applied to, and 2) receive messages from the control patch and dispatch them to C++.
Receiver patch, opened by libpd.
The control patch is opened in Pure Data and acts as the interactive patch. It has controls for setting the frequency and volume of the synthesizer tone that acts as the source, as well as controls for the filter effect that is being tested.
Control patch, opened in Pure Data, and serves as the interactive UI for testing.
As can be seen from the patches above, they communicate to each other via the netsend/netreceive objects by opening a port on the local machine. Since I’m only sending simple data to the receiver patch, I opted to use UDP over TCP as the network protocol. (Disclaimer: my knowledge of network programming is akin to asking “what is a for loop”).
Hopefully the purpose of these two patches is clear, so we can now move on to seeing how libpd brings it all together in code. It is worth noting that libpd does not output audio to the hardware, it only processes the data. Pure Data, for example, commonly uses Portaudio to send the audio data to the sound card, but I will be using Core Audio instead. Additionally, I’m using the C++ wrapper from libpd.
An instance of PdBase is first created with the desired intput/output channels and sample rate, and a struct contains data that will need to be held on to that will become clear further on.
struct TestData
{
    AudioUnit outputUnit;
    EffectProc effectProc;

    PdBase* pd;
    Patch pdPatch;
    float* pdBuffer;
    int pdTicks;
    int pdSamplesPerBlock;

    CFRingBuffer<float> ringBuffer;
    int maxFramesPerSlice;
    int framesInReserve;
};

int main(int argc, const char * argv[])
{
    PdBase pd;
    pd.init(0, 2, 48000); // No input needed for tests.

    TestData testData;
    testData.pd = &pd;
    testData.pdPatch = pd.openPatch("receiver.pd", ".");
}
Next, we ask Core Audio for an output Audio Unit that we can use to send audio data to the sound card.
The next part needs some explanation, because we need to consider how the Pure Data patch interacts with Core Audio’s render callback function that we will provide. This function will be called continuously on a high priority thread with a certain number of frames that we need to fill with audio data. Pure Data, by default, processes 64 samples per channel per block. It’s unlikely that these two numbers (the number of frames that Core Audio wants and the number of frames processed by Pure Data) will always agree. For example, in my initial tests, Core Audio specified its maximum block size to be 512 frames, but it actually asked for 470 & 471 (alternating) when it ran. Rather than trying to force the two to match block sizes, I use a ring buffer as a medium between the two — that is, read sample data from the opened Pure Data patch into the ring buffer, and then read from the ring buffer into the buffers provided by Core Audio.
Fortunately, Core Audio can be queried for the maximum number of frames it will ask for, so this will determine the number of samples we read from the Pure Data patch. We can read a multiple of Pure Data’s 64-sample block by specifying a value for “ticks” in libpd, and this value will just be equal to the maximum frames from Core Audio divided by Pure Data’s block size. The actual number of samples read/processed will of course be multiplied by the number of channels (2 in this case for stereo).
The final point on this is to handle the case where the actual number of frames processed in a block is less than the maximum. Obviously it would only take a few blocks for the ring buffer’s write pointer to catch up with the read pointer and cause horrible audio artifacts. To account for this, I make the ring buffer twice as long as the number of samples required per block to give it some breathing room, and also keep track of the number of frames in reserve currently in the ring buffer at the end of each block. When this number exceeds the number of frames being processed in a block, no processing from the patch occurs, giving the ring buffer a chance to empty out its backlog of frames.
int main(int argc, const char * argv[])
{
    <snip> // As above.

    UInt32 framesPerSlice;
    UInt32 dataSize = sizeof(framesPerSlice);
    AudioUnitGetProperty(testData.outputUnit,
                         kAudioUnitProperty_MaximumFramesPerSlice,
                         kAudioUnitScope_Global,
                         0, &framesPerSlice, &dataSize);
    testData.pdTicks = framesPerSlice / pd.blockSize();
    testData.pdSamplesPerBlock = (pd.blockSize() * 2) * testData.pdTicks; // 2 channels for stereo output.
    testData.maxFramesPerSlice = framesPerSlice;

    AURenderCallbackStruct renderCallback;
    renderCallback.inputProc = AudioRenderProc;
    renderCallback.inputProcRefCon = &testData;
    AudioUnitSetProperty(testData.outputUnit,
                         kAudioUnitProperty_SetRenderCallback,
                         kAudioUnitScope_Input,
                         0, &renderCallback, sizeof(renderCallback));

    testData.pdBuffer = new float[testData.pdSamplesPerBlock];
    testData.ringBuffer.resize(testData.pdSamplesPerBlock * 2); // Twice as long as needed in order to give it some buffer room.
    testData.effectProc = EffectProcess;
}
With the output Audio Unit and Core Audio now set up, let’s look at the render callback function. It reads the audio data from the Pure Data patch if needed into the ring buffer, which in turn fills the buffer list provided by Core Audio. The buffer list is then passed on to the callback that processes the effect being tested.
OSStatus AudioRenderProc (void *inRefCon,
                          AudioUnitRenderActionFlags *ioActionFlags,
                          const AudioTimeStamp *inTimeStamp,
                          UInt32 inBusNumber,
                          UInt32 inNumberFrames,
                          AudioBufferList *ioData)
    {
        TestData *testData = (TestData *)inRefCon;

        // Don't require input, but libpd requires valid array.
        float inBuffer[0];

        // Only read from Pd patch if the sample excess is less than the number of frames being processed.
        // This effectively empties the ring buffer when it has enough samples for the current block, preventing the
        // write pointer from catching up to the read pointer.
        if (testData->framesInReserve < inNumberFrames)
        {
            testData->pd->processFloat(testData->pdTicks, inBuffer, testData->pdBuffer);
            for (int i = 0; i < testData->pdSamplesPerBlock; ++i)
            {
                testData->ringBuffer.write(testData->pdBuffer[i]);
            }
            testData->framesInReserve += (testData->maxFramesPerSlice - inNumberFrames);
        }
        else
        {
            testData->framesInReserve -= inNumberFrames;
        }

        // NOTE: Audio data from Pd patch is interleaved, whereas Core Audio buffers are non-interleaved.
        for (UInt32 frame = 0; frame < inNumberFrames; ++frame)
        {
            Float32 *data = (Float32 *)ioData->mBuffers[0].mData;
            data[frame] = testData->ringBuffer.read();
            data = (Float32 *)ioData->mBuffers[1].mData;
            data[frame] = testData->ringBuffer.read();
        }

        if (testData->effectCallback != nullptr)
        {
            testData->effectCallback(ioData, inNumberFrames);
        }

        return noErr;
    }
Finally, let’s see the callback function that processes the filter. It’s about as simple as it gets — it just processes the filter effect being tested on the audio signal that came from Pure Data.
Not quite done yet, though, since we need to subscribe the open libpd instance of Pure Data to the messages we want to receive from the control patch. The messages received will then be dispatched inside the C++ code to handle appropriate behavior.
int main(int argc, const char * argv[])
{
    <snip> // As above.

    pd.subscribe("fromPd_filterfreq");
    pd.subscribe("fromPd_filtergain");
    pd.subscribe("fromPd_filterbw");
    pd.subscribe("fromPd_filtertype");
    pd.subscribe("fromPd_quit");

    // Start audio processing.
    pd.computeAudio(true);
    AudioOutputUnitStart(testData.outputUnit);

    bool running = true;
    while (running)
    {
        while (pd.numMessages() > 0)
        {
            Message msg = pd.nextMessage();
            switch (msg.type)
            {
                case pd::PRINT:
                    std::cout << "PRINT: " << msg.symbol << "\n";
                    break;

                case pd::BANG:
                    std::cout << "BANG: " << msg.dest << "\n";
                    if (msg.dest == "fromPd_quit")
                    {
                        running = false;
                    }
                    break;

                case pd::FLOAT:
                    std::cout << "FLOAT: " << msg.num << "\n";
                    if (msg.dest == "fromPd_filterfreq")
                    {
                        filter.left.setFrequency(msg.num);
                        filter.right.setFrequency(msg.num);
                    }
                    else if (msg.dest == "fromPd_filtertype")
                    {
                        // (filterType is just an array containing the available filter types.)
                        filter.left.setState(filterType[(unsigned int)msg.num]);
                        filter.right.setState(filterType[(unsigned int)msg.num]);
                    }
                    else if (msg.dest == "fromPd_filtergain")
                    {
                        filter.left.setGain(msg.num);
                        filter.right.setGain(msg.num);
                    }
                    else if (msg.dest == "fromPd_filterbw")
                    {
                        filter.left.setBandwidth(msg.num);
                        filter.right.setBandwidth(msg.num);
                    }
                    break;

                default:
                    std::cout << "Unknown Pd message.\n";
                    std::cout << "Type: " << msg.type << ", " << msg.dest << "\n";
                    break;
            }
        }
    }
}
Once the test has ended by banging the stop_test button on the control patch, cleanup is as follows:
The raw synth tone in the receiver patch used as the test signal is actually built with the PolyBLEP oscillator I made and discussed in a previous post. So it’s also possible (and very easy) to compile custom Pure Data externals into libpd, and that’s pretty awesome! Here is a demonstration of what I’ve been talking about — testing a state-variable filter on a raw synth tone: