Well, it’s finally time to do something useful with all this stuff. Not that command-line programs aren’t useful, but they have their limitations — especially these days. Making a plug-in is a great way to apply all the things I’ve been doing, which really culminates into making a deliverable product that has a use. I have thus decided to make a Match Envelope plug-in, inspired by a suggestion from my good friend Igor (thanks man!). This first part of the “making of” blog will cover some of the initial conception and development of the prototype program as well as introducing some of the planned features and parameters of the plug-in. Focus will not be on actual C++ code at this point, but more on the math and the concepts behind it.
This Match Envelope plug-in will be similar in many ways to an Envelope Follower. It extracts the envelope from a source audio file and applies it to a destination audio file. Envelope followers tend to be more geared towards MIDI and there are not too many (to my knowledge) stand-alone plug-ins that give you what you need. They can also be found as features in filters and other kinds of plug-ins.
The usefulness of them can vary quite a bit as we will see in more detail. Commonly we see Envelope Followers used to sync up a sound to a drum loop for example. Another benefit of using this plug-in involves layering sounds together. If a seamless blend is desired, the envelopes of the different layers must match fairly close or else we will hear the distinct layers. With a mix of more percussive sounds with sustained ones, an envelope matcher can be quite useful.
Furthermore, Match Envelope can be used to approximate the attack or release of instruments in an orchestra that have been recorded. Let’s say you wish to double the flute line, or even the bass line with something; the Match Envelope plug-in can assist in blending the two layers together. As will be discussed below, there will be parameters and features to control the effect because there are situations where we certainly don’t want a “lifeless” 100% match.
In addition to its uses in music, it can also be used in sound design, where layers upon layers of different sound sources are often combined to great effect. Given some of the cool and varied applications of this plug-in, and considering that there are not a great many of them out there, I felt this was an exciting project to take on!
So how does it work and where do we start? To extract the envelope shape from the source audio, we use windows of a certain size that will either take the peak amplitude or the average amplitude within that window and store it in a buffer. We then take those amplitude values and apply them onto the destination audio, effectively recreating its amplitude shape. Fairly straightforward in concept, but there’s more to it than that.
If we just apply the extracted envelope values to the audio, we’ll get a staircase. Thus we turn to interpolation. At first I went with linear interpolation, given by the formula
where we want y(x) with position x between points (x0, y0) and (x1, y1), and this resulted in a fairly good and accurate match. However, we need a better quality interpolation; one that will give us a smoother, more accurate curve that will result in better quality audio. For this we turn to cubic interpolation. The cubic equation will look familiar to most;
but as it has four unknowns (the coefficients a, b, c, d) we need four points in order to interpolate or solve it (remember that from math class?). Solving this equation isn’t terribly complicated; we take the derivative of y(x) and then solve both equations for x = 0 and x = 1. This assumes that the distance between successive x values is 1. For a more detailed explanation of how to solve this equation for the coefficients go here: http://www.paulinternet.nl/?page=bicubic
There was one problem I encountered after implementing this, however, that is worth mentioning. My window sizes were not of the unit value (1) and even moreso, can be changed by the user, so I did not have a constant for the distance between x values. The solution is pretty simple (almost too much so as I was heavily focused on workarounds that were far too complex). Basically we just scale the x increment value, which keeps track of our position, by the inverse of the window duration.
Let’s say we set our window duration to 20 milliseconds. That gives us our window size of 882 samples (assuming a sample rate of 44.1kHz). Our x increment value is then 2.268×10⁻⁵ (0.02 / 882) based on a window size of 0.02. But we need a window size that is effectively 1, so 1 / 0.02 is 50, and this is our scaling factor. The increment value is now 1.1334×10⁻³.
One final detail that caused a small issue was rounding error. At the boundaries of some windows, I would end up with an x value of 3.999999 or similar. This caused sample error that did not sound very good, but the solution was a simple matter of adding a very small value to the x position at the end of each window loop (0.0000001 for instance). Some additional testing with varying window sizes will be done to make sure no more sample/rounding error occurs.
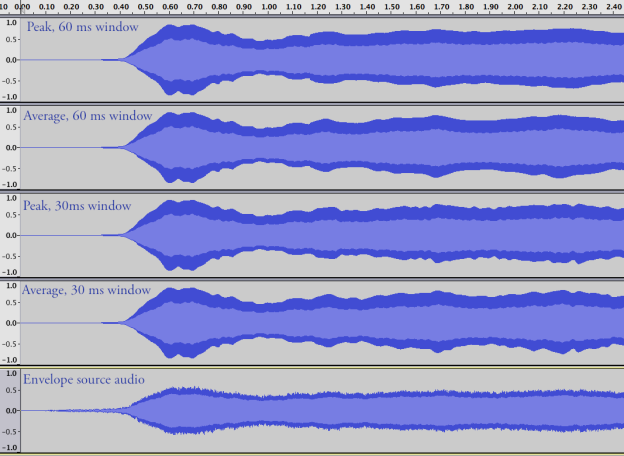
While on the topic of windows, their function is to affect the smoothness of the extracted envelope as well as its accuracy. Smaller window sizes will result in a closer match to the source audio’s envelope, and larger ones will be more of an approximation. Before moving on, let’s get a visual of how I’m testing out the functionality of the plug-in.
To really get a good idea of how the program is working, using something simple like a triangle wave is great for visualizing the outcome.
As I mentioned previously, there are two ways of taking the amplitude within each window: taking the maximum (peak) value, or taking the average. Just below we see the difference between them, and it is the intention at this point to have this as an option for which to use.
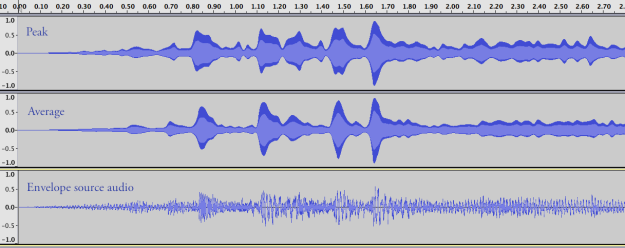
Here we can see a number of things already at work. The difference between peak and average amplitude is not very much. But in this case, the source audio is quite smooth and the destination waveform is completely constant. A following example will demonstrate the difference between these better. We also see the effects of different window sizes in the visual above. A very large window size (perhaps around 500 ms to 1 s) would retain much more of the shape of the destination audio and might be more useful for longer sustained sounds, while a shorter window length is better for capturing percussive sounds. The example below uses a different audio as the source, with more percussive attacks.
There is a clear difference between peak and average, at least visually. We will hear at the end of this post that they don’t differ a huge amount to our ears (at least not with these examples).
Before I wrap up this post, I want to discuss two additional features I’m planning at this point. One is just a simple gain, that scales the result of the envelope match. An extension of this feature will be to add an option where the user can specify that the amplitude at the end of the envelope will match the amplitude of the rest of the audio (i.e. at the junction point where the envelope ends, and the rest of the audio continues unmodified). This would be useful if the user just wants to match a section from a source audio file.
Secondly, I have implemented a parameter called “match strength %” that will control how strongly the envelope will modify the destination audio. The cool thing about this is that it’s proportional to the difference in amplitude between the envelope and the destination audio. To accomplish this, I scale the interpolated value, ival, by the equation
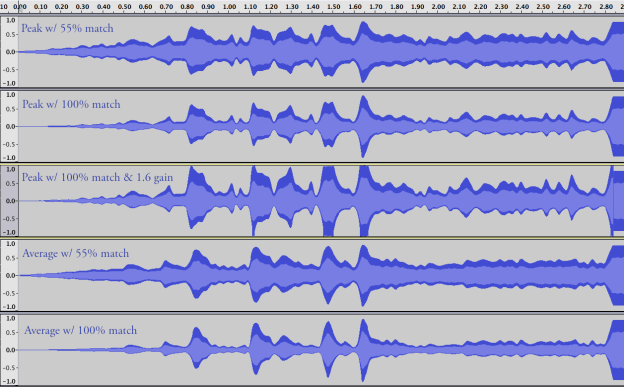
where buffer is the amplitude of the destination audio and a is a value in % specified by the user. We can see it visually in the image below.
The bigger the distance between the two amplitudes, the stronger the envelope affects the audio. This ensures that the general shape of the envelope remains, while retaining more of the original shape in relation to the specified % by the user. The middle waveform shows a gain factor of 1.6, but this was incorrectly implemented, as the gain modifies the interpolated value, ival, instead of the result of ival * buffer. As it is in the image above, gain is also proportional, but I intend it to be a linear effect.
Here are a couple of examples of how this process sounds at this stage. These audio samples use just the triangle wave that I have been using to test the program layered on top of the audio I extracted the envelope from. Listen to how the triangle wave follows the shape of the audio and see if you can hear a difference between the peak version and the average version (the peak version has slightly stronger attacks from the triangle wave).
Peak windowing: layered triangle wave over source audio
Average windowing: layered triangle wave over source audio
This has been a long and wordy post, so it’s time to wrap up. I’m pleased so far with the functionality and behavior of the plug-in and the parameters and features I am planning on implementing. It should provide a good amount of flexibility to shape a given waveform/audio file from an extracted envelope source, and should have some fun and productive uses.


