This entry in my making of a plug-in series will detail what went into finalizing the prototype program for the Match Envelope plug-in. A prototype of this kind is usually a command-line program wherein much of the code is actually written to implement functionality and features, and then later transferred into a plug-in’s SDK (in my case, the VST SDK). Plug-ins, by their very nature, are not self-executable programs and need a host to run, so it is more efficient to test the fundamental code structure within a command-line program.
Having now completed my prototype, I want to first share some of the things I improved upon as well as new features I implemented. One of the main features of the plug-in that I mentioned in part 1 was the match % parameter. This effectively lets you control how strongly the envelope you’re matching affects the audio, and rather than being a linear effect, it is proportional to the difference between the amplitude of the envelope and the amplitude of the audio. Originally this was the formula I used (from part 1):
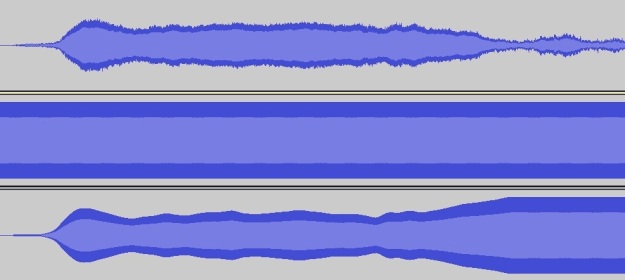
We could see that this mostly gave me the results I was after, but if we look closely at the resulting waveform, there is some asymmetry in comparing it to the original (look at the bottom of the waveforms).  One of the mistakes in this formula was in comparing the interpolated value ‘ival’ with the actual sample amplitude of the ‘buffer’. To remedy this, I now also extract the envelope of the destination audio that we are applying the envelope on to (with the same window width used to extract the source envelope) and use this value to compare the difference with ‘ival’. This ensures a more consistent and accurate comparison of amplitudes.
The other mistake in the original formula was to linearly affect ‘a‘, the alpha value that is input by the user in %, by the term that calculates the difference between the amplitudes. So while the a value does affect the resulting ival proportionally, a itself was not. The final equation then, just became:
I use two strategies when deciding on an appropriate mathematical formula for what I need. One is considering how I want a value to change over time, or over some range of values, and turning to a kind of equation that does that (i.e. should it be a linear change, exponential, logarithmic, cyclical, etc.). This leads to the second method, and that is to use a graph to visualize the shape of change I am after; this leads to an equation that defines that graph.
Here is a quick graphic and audio to illustrate these changes using the same flute source as the envelope and triangle wave as its destination from part1:
Flute envelope applied with 80msec window size at 100% match
Shortly, we will be seeing some much more interesting musical examples of the plug-in at work. But before that, we can see another feature at work above that I implemented since last time: junction smoothing.
In addition to specifying the length of the envelope, the user also specifies a value (in msec) to smooth the transition from the envelope match to the original, unmodified audio. Longer values will obviously make the transition more gradual, while shorter makes it more abrupt. The process of implementing this feature turned out to be reasonably simple. This is the basic equation:
where ‘ival’ is the interpolated value and ‘jpos’ is the current position within the bounds of the junction smoothing specified by the user. ‘jpos’ starts at 0, and once the smoothing begins, it increments (within a normalized value) until it hits 1 at the end of the smoothing. The larger ‘jpos’ gets, the less of the actual interpolated value we end up with in our ‘jval’ result, which is used to scale the audio buffer (just as ‘ival’ does outside of junction smoothing). In other words, when ‘jpos’ hits 1, ‘jval’ will be 1 and so we multiply our audio buffer by 1; then we have reached the end of our process and the original audio continues on unmodified.
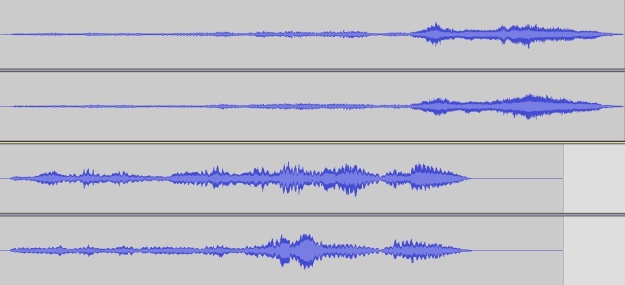
Before we move on, here is a musical example. This very famous opening of Debussy’s “Prelude to the Afternoon of a Faun” seemed like a good excerpt to test my plug-in on. This is the original audio (the opening is very very soft as most classical recordings are of quiet moments to preserve dynamic range, so I had to amplify it which is why there is some audible low noise):
Opening of “Prelude to the Afternoon of a Faun”
Using this as the source envelope, I used a window size of 250msec at 90% match to apply on to this flute line that I recorded in Logic, doubling the original from the audio above (the flute sample is from Vienna Special Edition).
Unmodified flute doubling of the Prelude opening
The result:
Flute doubling after Match Envelope
And here is the result mixed with the original audio:
Doubled flute line mixed with original audio
Junction smoothing was of course applied during the process to let the flute line fade out as in its original incarnation. Without smoothing it would have abruptly cut off. This gives us a seamless transition from the end of the flute solo into the orchestral answer.
It was very important in this example to specify a fairly large window duration, because we don’t want to capture the tremolo of the original flute solo as this would fight against the tremolo of the sampled recording that we are applying the envelope on to. We can hear a little bit of this in places even with a 250msec window, so this will be something I intend to test further to see how this may be avoided or at least minimized.
This brings me to the other major challenge I faced in developing this plug-in since part 1: stereo handling. Dealing with stereo files isn’t complicated in itself, but there were a few complexities I encountered along the way specific to how I wanted the plug-in to behave. Instead of only allowing a 1-to-1 correspondence (i.e. only supporting mono to mono, or stereo to stereo), I decided to allow for the two additional situations of mono to stereo and stereo to mono.
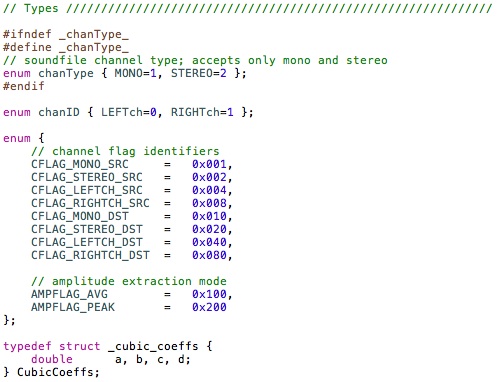
The first two cases are easy enough to deal with, but what should happen if the source envelope is mono and the destination audio is stereo, and vice versa? I decided to allocate 2-dimensional arrays for the envelope buffers to hold the mono/stereo amplitude data and then use bitwise flags to store the states of each envelope:
This saves on having multiple variables representing channel states for each envelope, so I only have to pass around one variable that contains all of this information that is then parsed in the appropriate places to retrieve this information.
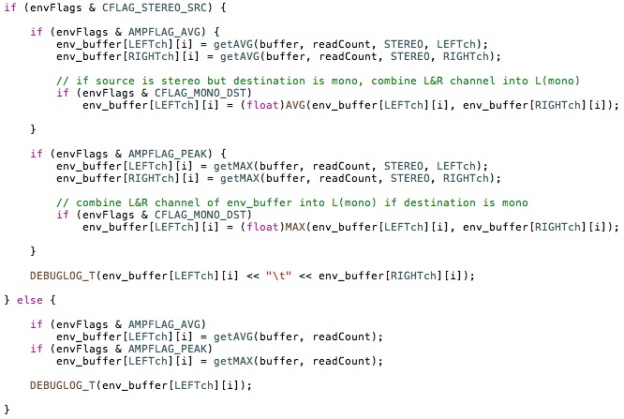
As we can see, only one variable (‘envFlags’) is used in the extraction of the source envelope, and we can find out mono/stereo information by using bitwise AND with the corresponding enum definition of the flag we’re after. Furthermore, in the case of the source envelope being stereo but destination audio being mono, I combine the amplitude data of the two channels into one, according to either average or peak extraction method (also specified by user).
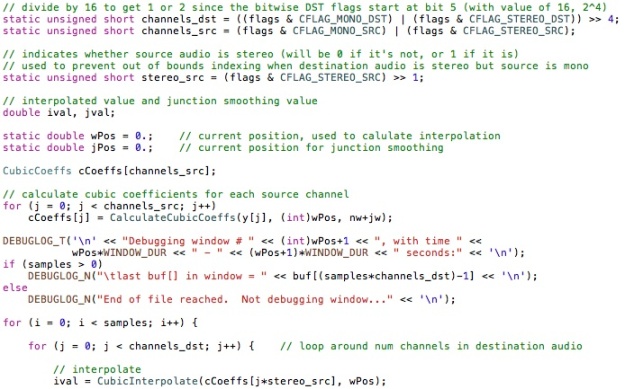
The difficulty in implementing this feature wasn’t so much in how to get it done, but how to get it done more efficiently, without a massive number of parameters passing around and a whole lot of conditional statements within the main processing loop to determine how many channels each envelope has. We can see some of this at work within the main process:
I use another variable (‘stereo_src’) that extracts some information from the bitwise flags to take care of the case where the source envelope is mono but destination audio is stereo. Since the loop covers the channels of the destination audio (in interleaved format), I needed a way to restrict out of bounds indexing of the source envelope. If the source envelope is mono, ‘stereo_src’ will be 0, so the indexing of it will not exceed its limit. If both envelopes are stereo, ‘stereo_src’ will be 1, so it will effectively “follow” the same indexing as the destination audio.
For the next, and last, musical example of this entry, we change things up a whole lot. I’m going to show the application of this plug-in to electronic dance music. This match envelope plug-in can emulate, or function as a kind of side chain compressor, which is quite commonly found in EDM. Here is a simple kick drum pattern and a synth patch that goes on top:
By applying the match envelope plug-in to the synth pattern using the kick drum pattern above as the source envelope (window size of 100msec and 65% match), we achieve the kind of pumping pattern in the synth so characteristic of this kind of music. The result, and mix, are as follows:
Match Envelope applied to synth pattern
Modified synth pattern mixed with percussion and bass
This part has really covered the preliminary features of what I’m planning to include in the Match Envelope plug-in. As I stated at the start, the next step is to transfer the code into the VST SDK (that’ll be part 3), but this also comes with its share of considerations and complications, mainly dealing with UI. How should this appear to the user? How do you neatly package it all together to make it easy and efficient to use? How should be parameters be presented so that they are intuitive?
Most all plug-ins/hosts offer up a default UI, which is what I’ll be working with initially, but eventually a nice graphic custom GUI will be needed (part 4? 5? 42?).


